This year the new generation of LCD projectors is clearly going to interest a lot of hometheater fans. The previous generation has already shown that the LCD technique is gaining on DLP rapidly. The new crop will close the gap even more with less visible pixel structure and higher contrast.
One of the more interesting models is the new Z4 from Sanyo. Compared to its predecessor, we are dealing with a completely new piece of hardware with numerous innovations and features. For almost four weeks, we've had the opportunity to test a pre-production prototype in our test rooms, and the preliminary impressions have had a significant impact: after only 14 days, more than 36,000 readers had drawn their own conclusions about the new Sanyo projector. For us, this was reason enough to get a finished model as soon as possible. This week we received it and once again Cine4Home proudly presents the first projector test of the Z4. There is every reason to be excited since the final review product offers plenty of surprises compared to the prototype.
In advance we would like to direct your attention to our test criteria which are described in detail in our Know How Special ”Projectors/Plasma Tvs – characteristics of quality – Cine4Home's test criteria”.
1. Equipment and Technology (Know How Link here)
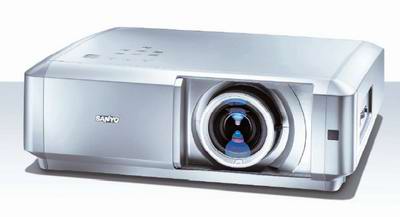
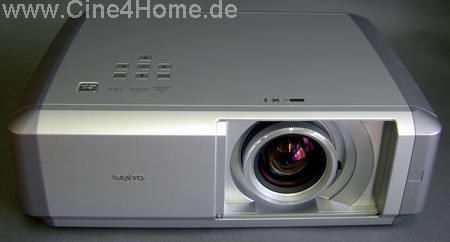
Being a newly developed product, the appearance of the Z4 is nothing like that of its predecessor. From the chassis to the lens and the settings, this is a completely new piece of technology.
Visually, the design seems very simple and functional. The measurements (382 x 126.8 x 304.3 mm) are clearly larger than those of the earlier models but are still within living room-friendly conditions. Compared to high-end DLP projectors, the PLV-Z4 is still a small model.
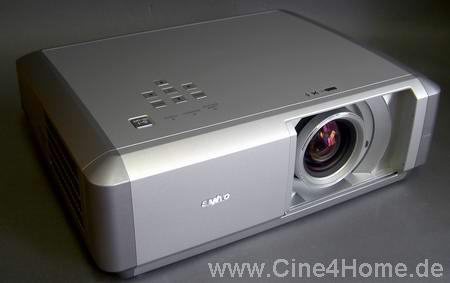
One part of the new model which really distinguishes it is the frontal slide shutter which opens and closes automatically. When not in use, this keeps the lens safe from its primary enemy, dust.
Closed: Completely sealed off chassis
When in use, the slide shutter reveals another new part of the projector, the lens. It is quite obvious that it is bigger than those of the predecessors' and the zoom range has been increased accordingly.
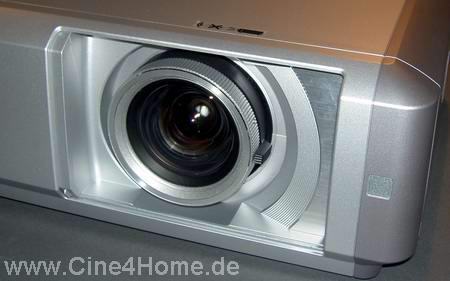
The optics of the PLV-Z4
Furthermore, the larger lens ring allows for more precise settings of sharpness, and the zoom ring makes finely tuned zooming even more easy than it was before.
All in all, Sanyo has succeeded in making a piece of equipment where every part of it seems more reliable and of higher quality than before. For its price range, the PLV-Z4 is exemplary.
1.1 Technology (Know
How Link here)
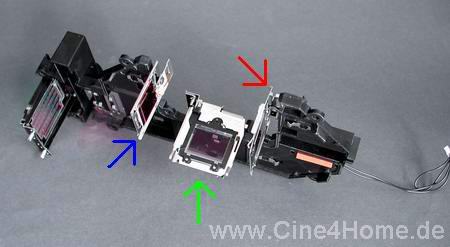
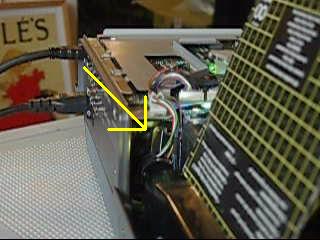
The most noteworthy innovation of the Z4 is the use of the D5 LCD panels, which are the newest generation from Epson. These are supposed to minimize the tiny gaps between the pixels and thereby make it possible to get an image with higher light output and more contrast.
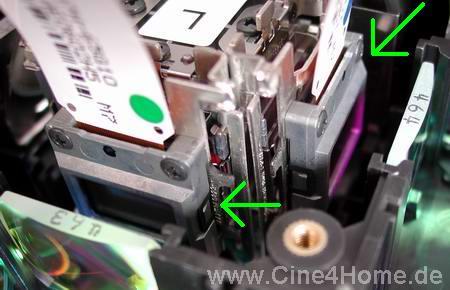
The new D5 panels mounted on a prism block (arrows)
One part of the D4 generation which remains is the native resolution of 1280x720 pixels, which corresponds to the smaller one of the HDTV standards. That means the Z4 officially is "HD-ready" and thereby future proof for use with various coming HDTV providers in Germany.
The Z4's source of light is a 145Watt UHP lamp with an expected life span of up to 3000 hours, which should put any worries about the economics of projectors to rest. According to the specifications, the lamp is able to achieve a light ouput of 1000 Ansi lumens.
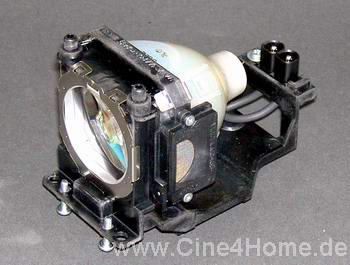
Should the lamp need replacing after (hopefully) many hours of movie use, the operation is carried out in a few minutes time. Simply turn over the Z4 and loosen a few screws to gain access to the lamp pit.
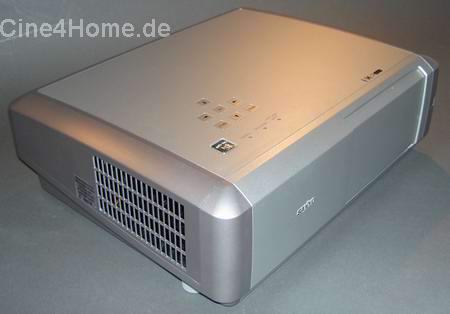
Such a durable lamp naturally needs efficient cooling – quiet cooling optimally. Luckily, the Z4 is among the most quiet projectors on the market. Making use of the enlarged chassis, the exhausts are larger and the airflow has been optimized to allow for a noise level of only 22db (in eco mode). We confirmed this during our test. The Z4 does in no way disturb the enjoyment of watching movies.
The airflow enters the Z4 in the same manner as the predecessors: through the air-intake at the machine's back. This is also where you will find the dust filter.

Air-intake at the back
The location of the air-intake and filter makes it a necessity to have a certain amount of space behind the projector. When cleaning the filter, the Z4 is quite easy to handle since the filter can be removed without problems whether the projector is table mounted or ceiling mounted. Removal of the projector from the mount is therefore never necessary when cleaning the filter.
Should be cleaned regularly: The main filter
Even with good airfilters, it is still nearly impossible to prevent dust from reaching the LCD panels. Sooner or later this will lead to coloured "dust blobs" entering the image. Normally, removal of the dust blobs would necessitate a (most likely) costly service check with the manufacturer. Not so with the Z4 since the famous "Hurricane Blower" is still included in the package just like with previous models.
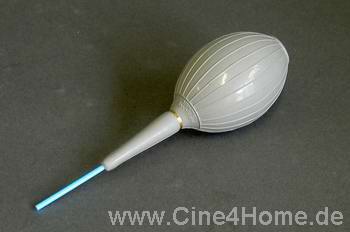
The Hurricane Blower
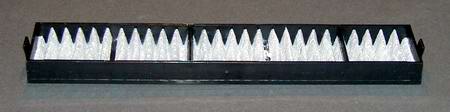
Although the name might seem a bit inappropriate in the light of global warming and its consequences, the device is both simple and functional. On the bottom side of the projector you will find six vents which give direct access to the front and back of the three LCD panels.
If you then insert the Hurricane Blower into one of the holes, you will be able to expell any dust corns with a minimum of force. So far no other manufacturer has adopted this method which puts the Z4 leaps and bounds above the competition.
Back to the cooling: the lamp-heated air leaves the projector through an exhaust situated at the frontal right side. This way of getting rid of the hot air is quite similar to the predecessors, but has still allowed for improvements in the isolation of light emittance. Compared to the Z3, the amount of distracting extra light has decreased and thereby yet another deficiency has been improved.
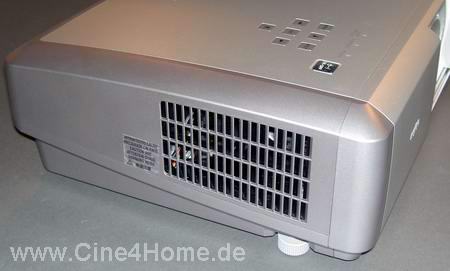
Air exhaust of the Z4
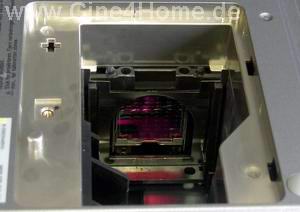
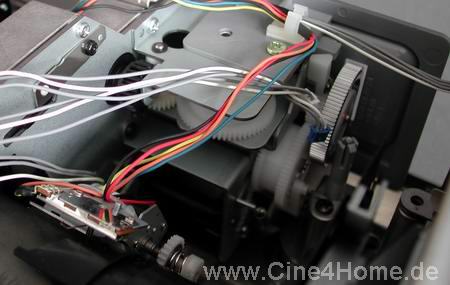
The second most important innovation after the new LCD panels is the use of an automatic iris shutter. This feature was introduced by Panasonic and Sony last year, and almost every manufacturer has implemented it in their current models, including Sanyo. The technique itself and its merits are under some dispute, and the advantages and drawbacks will be discussed during the image test. To us, the most important thing is how well it works in actual use. To better understand the principles involved, we have taken the PLV-Z4 apart. In that context we would once again like to thank Karsten Becker from www.dvdplayer.de whose skills were of much help during this procedure.
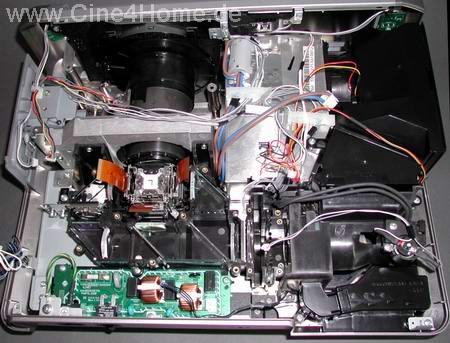
After opening the cover we get an idea of how the inner workings of the projector is laid out.
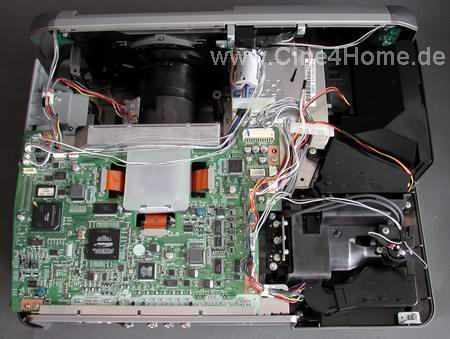
The machine looks a lot more spacious than it's predecessor and the individual components are clearly distinguished from each other. The motherboard conceals the most interesting part, the optical path.
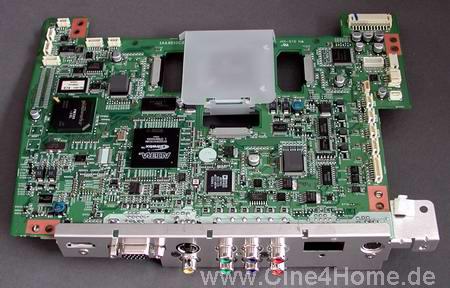
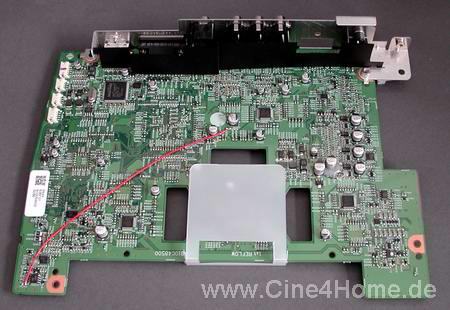
Motherboard of the Sanyo PLV-Z4
A new part of the electronics is the video processing unit. Colour reproduction is now treated to a 12bit signal process which technically allows for more than 68 billion different colours.
We have delved deeper into the projector to get a more detailed look.
Projector with open optical path
On the cover of the optical path we find the polarization filters which are partly responsible for contrast and black levels.
A plan of the optical path shows the precise route of the image process:
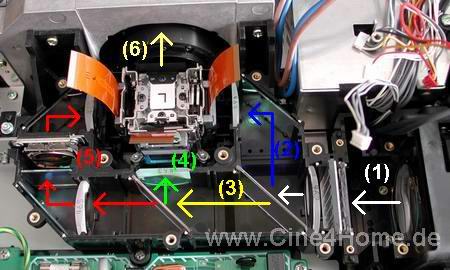
Initially (1), the white light of the projector lamp passes through various optics and integrator lenses. Secondly (2), a diagonally positioned semi-transparent mirror isolates the blue colour which, using another mirror, is then aimed at one of the three LCD panels. The remaining yellow colour reaches the second semi-transparent mirror (3), which isolates the green portion of the colour spectrum and leads it to the second LCD panel (4). Remaining is the red colour which reaches the third panel (5) through additional mirrors and optics. The three LCD panels then create the image according to the individual colour combinations. They are all mounted on a glass prism which finally (6) unite the three individual images into one. The "finished" image leaves the projector through the lens and gets projected onto the screen.
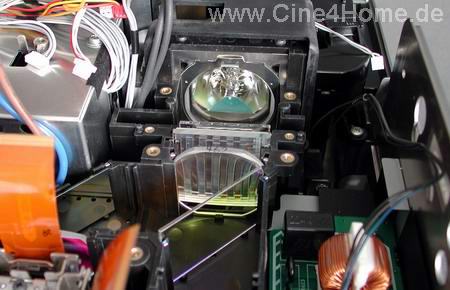
The beginning, the projection lamp
Where does the infamous automatic iris shutter come into the picture? It's right behind the lamp between the first lenses.
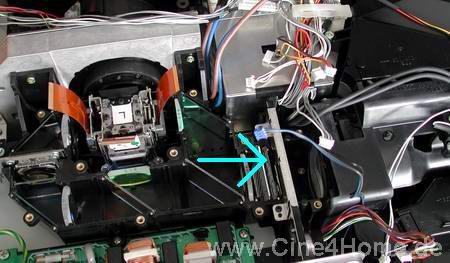
Arrow: adaptive Iris shutter
We have also isolated the adaptive iris to further enlighten you regarding its function.
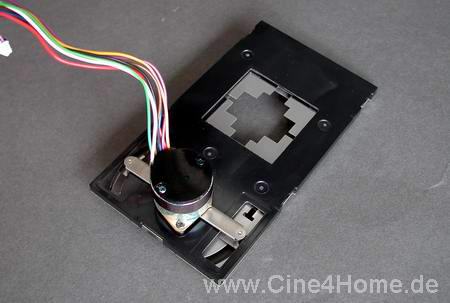
In the image above, you see the iris module. It consists of a quiet induction motor with two metal wings which can shift against each other like a sliding door. When the two wings are apart, the enlargened opening will allow a maximum amount of light to pass through (for bright scenes).
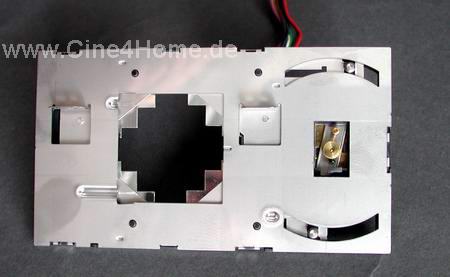
Open shutter
When the two wings are brought together, the light opening is reduced to a small square of only a few milimetres from side to side. This ensures better black levels during dark scenes.
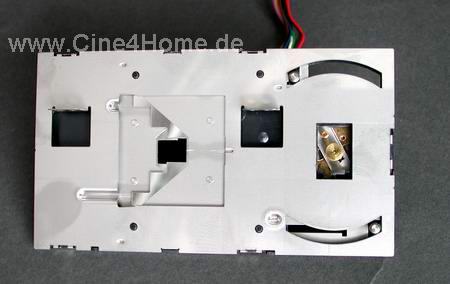
closed shutter
This way of doing things is quite different from that of the new models from Panasonic and Sony. We will elaborate further on this in the image portion of the review.
The technical structure of the Z4 shows that not only are the innards alteratered significantly compared to the Z3, but in several cases they are of a brand new design. To what effect, we shall see in our image test.
1.2
Connections / Signal types (Know
How Link here)
The selection of connections on the PLV-Z4 hasn't changed compared to the Z3 apart from the more spacious arrangement.
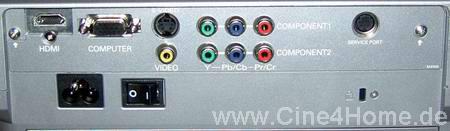
The inputs of the Z4
Available are the following: 1x HDMI, 2x component (YPbPr), 1x s-video, 1x composite and 1x RGB H/V (VGA). This allows for any video source from DVD players to satellite receivers and computers to be connected. It is also worthy of praise that the VGA input is compatible with interlaced RGB of the variety you often get from most scart connections. Another digital connection would have made the projector even more future proof and prevented the need for switch boxes though.
All relevant types of signals are supported: NTSC 480i/480p, PAL 576i/576p, HDTV60 720p/1080i and HDTV50 720p/1080i as well as numerous PC resolutions (VGA, XGA, WXGA etc.) are accepted in both analogue and digital form.
1.3 Setup (Know How Link here)
Setting up the projector was an excercise in flexibility with the release of the Z3. Sanyo has not rested on their laurels though - quite the opposite in fact: through the use of newly implemented optics, Sanyo has succeeded in increasing the zoom range substantially. Thereby the Z4 is no longer at an disadvantage compared to the competing models from Panasonic. The resulting throw distance is adaptable to any kind of living room and will allow for truly wide image sizes which really emphasize the hometheater feel.

In spite of the increased zoom range, the lens shift function has not been impaired. With even larger shifting now possible, the lens shift portion of the projector has been newly constructed from scratch. The lens shift controls are now positioned at the left side of the projector, and they are both larger and more sensitive than in their previous versions.
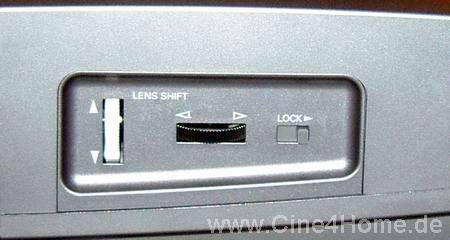
The practical lens shift
The choppines and jumps that came with adjusting lens shift on the Z2 and Z3 is now a thing of the past.
Improved lens shift mechanics
One thing which a lot of effort has been put into is the locking lever which makes sure the lens shift settings are maintained without having to re-adjust them later on. The greatest improvement to the lens shift is the fact that sharpness no longer seems to suffer from stronger levels of lens shifting.
2. Operating the projector (Know
How Link here)
Even though using the projector is very much like the PLV-Z3, there have been made some changes in areas such as functions and features.
2.1 Remote Control
The new remote control is not an improvement. The Z3's remote was close to being the perfect remote for a projector, but the new one seems a bit barebones.
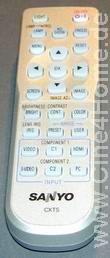
Although it's clearly smaller, it still lies comfortably in your hand. But it is not in the same league as the ergonomic Z3 remote. Fortunately, the large transmission range remains and makes remote controlling convenient. All in all, the remote seems to be modelled on the remotes of such models as the PT-AE700, TX100 etc.
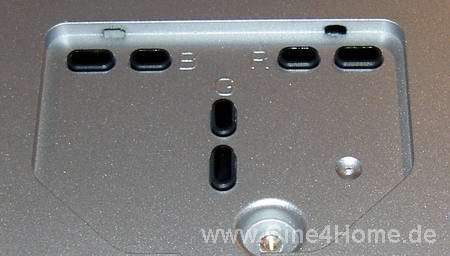
Without the remote, it is still possible to control the PLV-Z4. On the top side of the projector, you will find all relevant buttons laid out in a way which is elegant as well as user friendly:
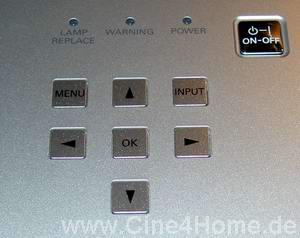
button-layout on the projector
2.2 Menus
The Sanyo PLV-Z3 already offered numerous functions, but the way they were structured left something to be desired. First and foremost, it was difficult to get a good overview and the user-friendliness suffered from it. The engineers have realised this and remade the menus for the PLV-Z4. Graphically, they are now easier to navigate and better structured – even without using the manual, you will intuitively know your way around. The result is menus which are faster to access which makes navigating them a breeze.
All functions are divided into seven main sections: "Picture", "Picture settings", "Position", "Aspect", "Connection", "System settings", and "Image properties".
In the "Picture" menu, the user can select between different image presets and four separate save slots.

The individual presets are pretty selv-explanatory from their descriptions. We will go into further detail about how they work during the image test.
"Picture settings" contains various functions for advanced users:
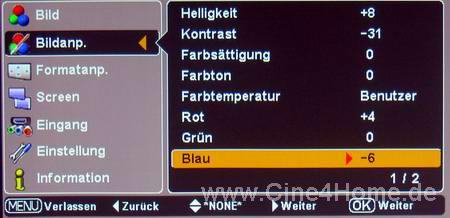
Apart from the usual settings (contrast, brightness, colour temperature), the first page of the section (see above) also contains three settings for each of the three basic colours which affect all levels of brightness equally. That means, it is possible to achieve a more accurate white level.
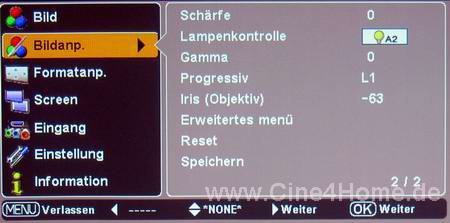
The second page (see above) involves sharpness and gamma functions. The latter influences the overall brightness levels of the image. Behind the function named "Progressive", the activation of the de-interlacer film mode is hidden just like it was with the Z3.
In "Lamp control" the user can select the desired lamp function. For most users, the eco-mode will be the first choice since it delivers the most quiet cooling. To get the best image results, the "A 1/2" mode is better suited since the lamp adapts its own lumen output in order to achieve better contrast.
A subsection of the second page is the "expanded menu" which should be of particular interest to experts.
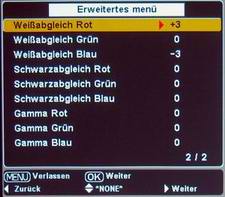
With the help of RGB, gain, bias and gamma settings, it is no problem to reach perfect brightness levels. The number of settings is unparalleled by any other entry level projector.
The second page of the expanded menu contains additional functions which for the most part can be categorised as "useless gimmicks". For the most part, they make the picture worse rather than improving it.
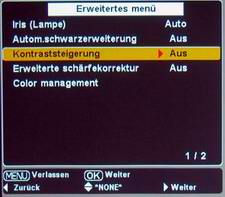
Among things which are not only new but also usable is the selectable iris mode and the colour management. Both functions will be described in detail during the image test.
The third main category "Picture position" contains highly usable functions. Particularly noteworthy is the variable overscan control and the horizontal and vertical image positioning.
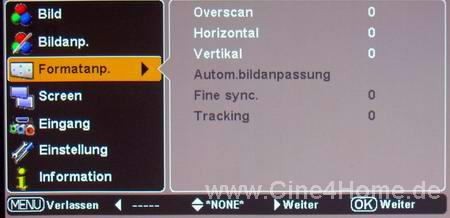
With analogue video sources (YPbPr for instance), it is even possible to set tracking and phase to prevent image artifacting.
In the categories "Aspect" and "Connection", the format of the image (16:9, 4:3 etc.) and the connections (HDMI, component etc.) can be chosen.
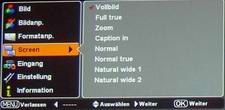
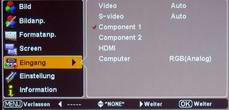
The categories "Aspect" and "Connection"
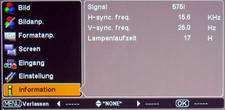
Last but not least, we have the main categories "System settings" and "Image properties". The former deals mostly with settings that influence the appearance of the user interface which can be suited to your peronal taste. The latter is an interesting source of information about the signal currently in use.
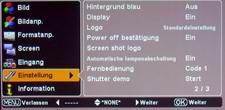
Overall, the control concept of the PLV-Z4 is exemplary and well thought out. With the use of the reliable remote control, you can navigate with ease through the many menus which contain an abundance of useful as well as useless functions. It seems like every eventuality has been covered without leaving room for any weaknesses.
3. Image test
As the first two chapters have already shown, the PLV-Z4 is so far an impressive new piece of technology. But lets return to our initial question: Have the innovations resulted in a new image?
3.1 Screendoor / Pixel structure (Know How Link here)
One of the known weaknesses of LCD projection has always been the relatively large distance between the individual pixels which under normal viewing conditions (and maximal sharpness) result in a kind of screendoor effect. The new D5 generation from Epson should help remedy this somewhat. The empty lines between the pixels should be narrower, which not only decreases the visible pixel structure but also increases the maximal light output and contrast levels.
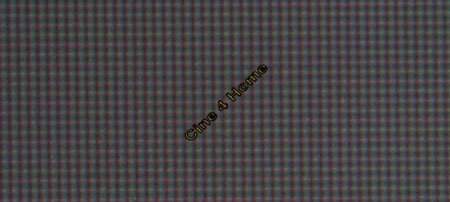
Old D4 panel above, new D5 panel below
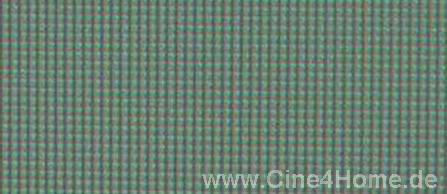
As the comparison above shows, the improvement in pixel structure is so small that it practically is of no importance. Considering the high native resolution, very few people will be annoyed at the pixel structure from recommended seating distances though.
3.2 Color Space (Know
How Link here)
Home Theater fans and reviewers are becoming more and more demanding. For a long time it was enough to simply have good colour reproduction to receive top marks. This critieria has been met by LCD projectors for quite some time now. The PLV-Z4 manages to impress with its primary colours, which make animated features come to life on the screen.
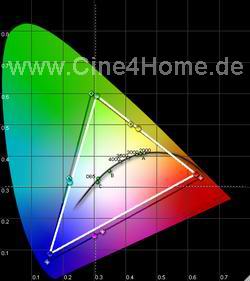
The CIE diagram shows that the Z4 has a large colour range (white triangle) which follows the video norm (dark triangle).
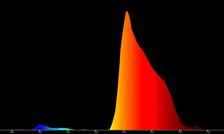
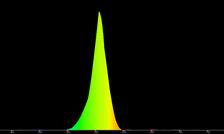
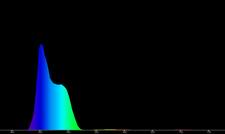
Spectral analysis of the prime colours and white
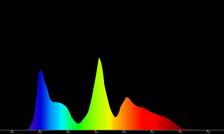
These days, this is no longer enough: tuning of the secondary colours is also a necessity, which in the case of the Z4 lie remarkably close to the desired values (dots on the white lines). This doesn't cut it since Panasonic and Sony introduced a new colour management system, which Sanyo also incorporates now. Using a target colour as reference, the desired colour can be selected directly from the test pattern and subsequently adapted to your liking.
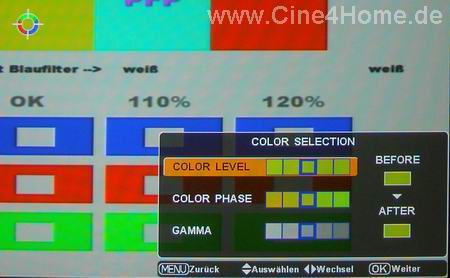
Color Management of the Z4
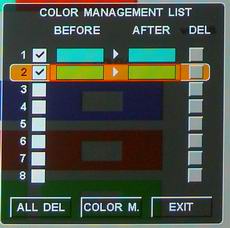
All altered settings are then displayed in an orderly manner on a list. They can be altered more or reset if you should choose so.
In "Colour management", videophiles are given loose reins with the option to fiddle with any thinkable image setting in order to achieve the best possible colours.
3.3 Color Temperature (Know
How Link hier)
A large colour range and correctly setup primary and secondary colours are by themselves not enough to ensure a perfect colour reproduction. In addition, you must also adjust the white level according to that of the source material (normally 6500k, D65).
As we already hinted at in the "Operating the projector" chapter, the PLV-Z4 offers various picture modes for different operational circumstances. Those which are intended for movie use in darkened hometheaters are "Bright Cinema" and "Authentic Cinema".

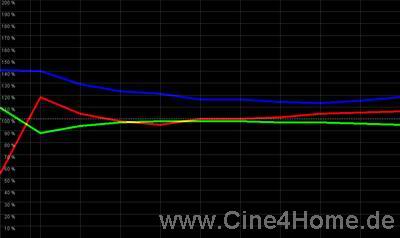
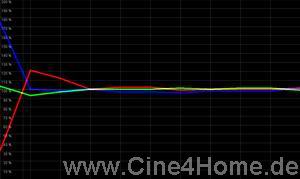
White balance, Authentic cinema
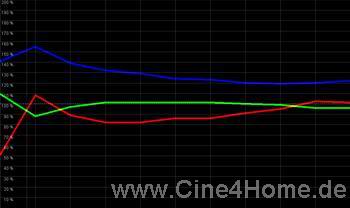
The upper diagram shows the colour tone of the "Authentic Cinema" mode. It readily shows an acceptable colour tone, which comes relatively close to the recommended D65 standard. However, in all types of brightness, a certain surplus of blue and red (= magenta) is present which colours the image representation a bit.
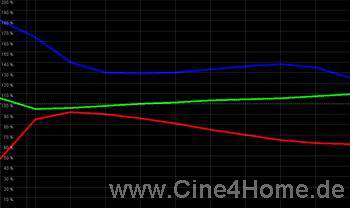
This diagram shows the brightness level of the "Bright cinema" mode: this is also acceptable, but does exhibit a surplus of blue which renders the movie images a bit too cold.
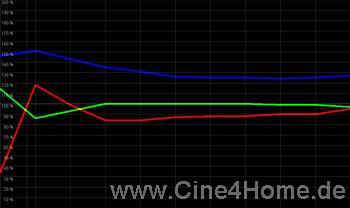
Thanks to the many image settings in the user menu, an experienced "calibrator" should be able to attain perfect white levels quite easily. After only a few minutes we got excellent results:
Initial optimised white levels

With more patience, even better results can be achieved. People who love to calibrate their equipment will find that the possiblities are practically limitless.
The other factory presets are primarily optimised for brightness and/or contrast and do not really offer good colour levels for a home theater. For the sake of completeness, we have also measured the colour levels of these presets.
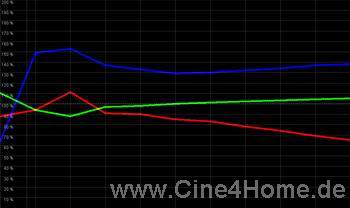
"Dynamic" mode: too much blue, too little red, not linear
"Bright" mode: resembles "Dynamic", clearly too cool
"Vivid" mode: linear, but too cool.
"Natural" mode: Not natural!
3.4 Black level, Contrast, Brightness (Know
How Link here)
We now get to the most exciting part of this test – the contrast level. Judging by the specs, we are dealing with a major leap in progress since the PLV-Z4 is rated at a 7000:1 contrast ratio. As often is the case, such specs should be taken with a grain of salt which is why we have done our best to measure everything thoroughly.
The secret of the high contrast ratio is the automatic iris shutter which adapts to the current image content. Panasonic and Sony introduced this technique last year with great success and now Sanyo has taken the same route. As we described under "Technology", the iris shutter automatically closes during dark scenes and opens during bright ones. In this way, the brightness appropriate for each scene should be projected onto the screen.
Using this technique, the immediate question is: How discretely and effective does the iris act? Sanyo has not taken an approach which is especially fast, but rather they have employed a fairly slow iris shutter. To avoid disturbing jumps in brightness levels, the iris closes and opens in a way which in most cases will not be perceived by the human eye. This is best understood by looking at how the iris operates. Luckily, the engine arm of the iris is easy to see when you remove the cover of the projector. We won't withheld this experience from you and have therefore filmed the iris engine during a normal movie scene:
The mechanised arm of the shutter (arrow).
Click on the picture to start the vieo sequence (.avi). Right mouse button to save
In the video, it is easy too see that the iris is constantly working and reacting to the changing image content. Using test images, we have concluded that the engineers have programmed the Z4 with three different "iris program modes":
Mode1:
In the first mode, the average brightness of the image is determined. The iris is active by average brightness below 30% (30IRE). In this mode, the iris is working using very small intervals. By a brightness of 30% and above, the iris is completely open and doesn't change its status in any way.
Mode2:
The second mode works like the first one did, but is rather aimed at "contrast lovers" with darkened hometheaters. Here, the iris is active between brightness levels of 0% and 30%, but also incorporates a greater dynamic range. Like the first mode, it still closes during dark scenes which results in impressive black levels.
Mode3:
The third mode on the other hand does not close the iris shutter nearly as much – roughly two thirds as much. The attainable contrast levels are comparable to those of mode 1 with the difference that the iris shutter doesn't react between 0% (black) and 10% brightness. It does remain "on" though. It's only in motion during cases of 10IRE to 30IRE.
Sadly, these three modes are not readily selectable by the user, but are dependent of the chosen image presets and lamp modes. This makes it a bit difficult to play with since you basically have to experiment and guess until you've reached the mode you desire.
Regarding the iris shutter, the adaptive lamp mode of the predecessor is still present. It acts according to the image content and can increase the contrast levels even further. In most cases it will probably remain unused since it results in a noisier cooling of the projector.
So how high are the resulting contrast levels of this technique? It astaunded everyone when Sanyo announced the contrast ratio a few weeks back. We have tested the maximal contrast levels and were surprised: The Z4's contrast levels are significantly past the 7000:1 mark. But as we already described in our preview test, the high contrast isn't maintainable with accurate colour levels.
High constrast (7000:1), but wrong colours
The net contrast levels which remain with accurate D65 colour reproduction are around 1600:1, and sometimes (with patience) 1800:1. The adaptive iris and the new D5 panels have therefore almost doubled the contrast levels of the predecessor. The results are improved black levels and increased maximum brightness. This makes the image noticeably more three dimensional and lifelike.
The technique of the adaptive iris shutter is not undisputed: many consider it a brilliant breakthrough while others label it as nothing more than a marketing ploy. The critics believe it to have a dramatic effect on measurements but no real improvement on the image itself. As often is the case, the truth is somewhere in the middle: The fact of the matter is that an adaptive iris shutter can't increase the actual intra-contrast of a projected image. On this field, the DLP technique is the undisputed leader. On the other hand, it can't be argued that the iris shutter makes dark scenes appear really dark without disturbing shades of grey. At the same time, bright scenes are so bright that outside recordings remain believable. And black level and brightness are among the most well-known weaknesses of digital projectors. The adaptable iris shutter is really nothing more than the reverse of the camera iris used in photography (which is responsible for the lighting) and in some scenes its alterations will be noticed.
Up for discussion is sadly the (not) unnoticeable way the iris functions, which leaves room for improvement by coming generations of projectors. After extended periods of use, especially during dark scenes, it is possible to distinguish the workings of the iris from looking at the image. Particularly during fast cuts from bright to dark scenes, the optimum brightness isn't reached as quickly as it should. Nevertheless, the impressive depth of the image is owed in great part to the use of this technique, which makes the image quality much better during these scenes compared to older models. And if the iris shutter isn't to your liking, you can always disable it completely.
The in-image contrast of the Z4 is also very impressive. Seldomly have we seen such a versatile LCD image on the screen. The D5 panels seem to have resulted in a noticeable improvement here.
The contrast ratio can not be used to directly determine black levels and brightness. In this area, Sanyo is also going for flexibilty in order to satisfy all tastes: Using the remote, the motorised iris shutter can be adjusted into 64 different levels. Their influence on the contrast is small, which enables the user to model the black levels and maximum brightness on the living room conditions as well as personal taste. Everything is possible from deep blacks to sun-bright images in all image sizes.
All in all, the principle of the two iris shutters is well thought out, since they can be configured individually. The attainable results in areas such as black level, contrast and brightness are on a level which really is surprising for the LCD technology. Above all, the image three dimensionality is outstanding.
Notes:
- By deactivating the iris shutter, the maximum contrast ratio is between 1800:1 (Dynamic) and 1100:1 (Pure Cinema).
3.5 Luminance tracking / uniformity (Know How Link hier)
The already mentioned three dimensionality of the projected image can only be appreciated when the distribution of brightness is optimised properly. Currently that means an increase of 2.2 - in blacked out hometheaters, up to 2.5 is a possibility. As we mentioned in the chapter "Colour temperature", the modes "Bright cinema"/"Authentic cinema" are those best suited for movie use.

Gamma Cinema
In the gamma diagram, we also find impressive results. With the increase of precisely 2.2, we come surprisingly close to the recommended levels. With this, we get an image with complete uniformity in the distribution of light. Using this precise configuration, the image appears three dimensional and lifelike. Only one weakness of the projector is unadressed: The darkest parts of the image just above black aren't perfect but do appear very dark and prone to being influenced by low levels of ambient light in the room.
Overview of the other gamma values:
Dynamic: 2.1 (low s-curve, clipping tendency)
Bright: 1.52 (high s-curve)
Vivid: 1.87
Natural: 2.2
3.6 Sharpness / Brightness uniformity / convergence (Know
How Link hier)
The new optics of the Z4 has not only resulted in a larger zoom range. According to our tests, areas such as sharpness, light spill and convergence have also yielded convincing results:
According to our test equipment, the image sharpness remained fine over the complete surface of the image – even when using the lens shift more aggressively. This is a clear improvement over the predecessor, the Z3.
Examining the Brightness Uniformity, we had only good experiences: the light spill at corners is so low over uniform surfaces that the human eye won't perceive it. The image is uniformly illuminated throughout.
On the third point, convergence, we were equally impressed: The three LCD panels are so well aligned that only minimal amounts of colour bleeding can be detected in the image. It was so low during our testing that it was impossible to point out when running movie footage.
3.7 Overscan (Know
How Link here)
When it comes to overscan, there are always problems: Either the overscan is too high and too much picture is cut off at the edges or there is no overscan and inaccurately mastered DVDs and broadcasts will have black edges (underscan).
The optimum solution is to have a variable overscan control which the user can use to determine if and how high the edges of the image should be cut. The Z4 comes with such an overscan control: The image can be zoomed in ten different stages.
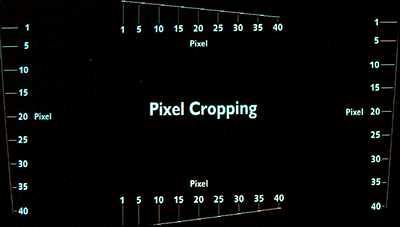
The variable overscan, from off (above) to about 25 pixels on each side (below)
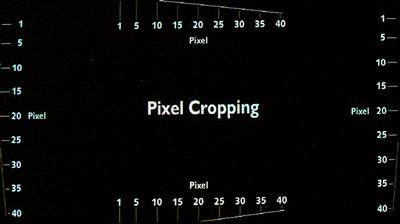
During analogue playback, our test equipment exhibited a small bug. Even when overscan was turned off, around 10 pixels were missing on all sides. Time will tell whether retail models will show the same error as the one we received for this review.
3.8 De-Interlacing (Know
How Link hier)
When it comes to de-interlacing, very little has changed compared to the previous models. For an entry level projector, it is quite good.
"Videomaterial"
If you use the projector as a TV, then the majority of video you send to it will have been shot with television cameras (sports, shows etc.). What we are dealing with is so called "video material" where the image consists of half frames. A half frame only contains half of the image information which is needed for a progressive presentation. It is up to the projector to generate the missing image lines. The de-interlacing circuitry of the PLV-Z4 does this admirably. After the motion adaptive processing, the motionless picture elements from two consecutive half frames are put together while moving parts of the picture are upscaled to twice the vertical resolution through interpolation. Movements in the resulting image are more fluid and do not exhibit any flickering around the edges. This quality makes the Z4 completely suitable for TV use.
"Filmmaterial"
Film material on the other hand is much more difficult to convert for the projector in an adequate way. From the movie master, the transfer to video results in two half frames. The projector now has to combine these two half frames into a progressive film image. The problem here is that the projector without any additional information has to decide for itself whether or not the incoming signal is film material and which half frames should be used to form it.
The pre-predecessor Z2 had several problems here. It wasn't capable of recognizing PAL film material (2:2 pulldown) properly and create the complete image adequately. Not the case with the Z4: PAL is no longer an obstacle when dealing with film material. The correct speed is instantly recognized and the movie images are reconstructed with a resulting high degree of detail. From time to time it can happen that the Z4 momentarily falls back into video mode which people with good eyesight will notice as loss of detail. A good progressive scan DVD player still has the advantage in this field.
3.9 Details / Scaling / Sharpness
In our preview test, the signal processing and scaling were a bit lacking. In this review we want to get more exact results:
3.9.1 Signal processing
Under optimal conditions, the signal processing of a projector will result in a maximum of image sharpness without annoying edge halos. In the case of the PLV-Z4 we have four stages to choose from.
Analogue
By analogue playback, the factory preset "0" is too high with resulting edge halos. By lower settings, these halos disappear without diminishing the dynamics in the finer details. In this area, a weakness of the predecessor has been improved..
only minimal edge halos (highly enlarged)
Digital
As expected, the results from digital playback were even better. Halos were nowhere to be seen.
3.9.2 Horizontal scaling
Image representation is especially simple for a projector when the incoming signal fits with the native resolution (1280x720). In practice, this will rarely be the case: our everpresent television standard PAL does not go higher than 720x576 pixels which is too low horizontally as well as vertically. The projector has to generate the missing pixels by itself – also known as "scaling". Converting the resolution like this will often result in annoying side effects such as image artifacting when using certain resolutions. During our test of the Z3 last year, the scaling turned out to be outstanding.
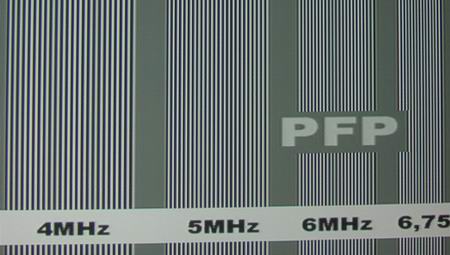
Likewise, the Z4 succeeds in reproducing a PAL signal without any line fluctuations as you can see in the test image above. Even the difficult 6Mhz area has no issues.
When it comes to colour fidelity, the engineers have also succeeded in outdoing the Z3. Using analogue connections, it is now so precise that nearly no differences can be found when comparing it with HDMI (with high bandwidth signal).
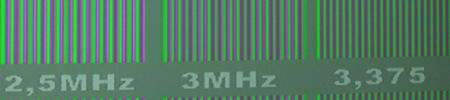
Analogue above, digital below, both very good

3.9.3
Vertical scaling
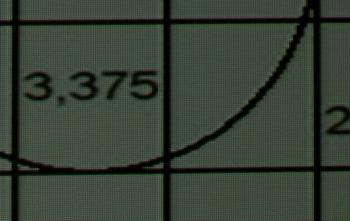
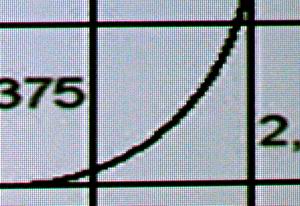
Vertical scaling is usually more difficult to master since the leap in resolution from 576 to 720 is relatively small. This went with hardly any issues. The Z4's scaler was an allround satisfying experience: the higher resolutions (256TVL to 425TVL) were displayed without any major artifacting and thereby no loss of quality in the projected image.
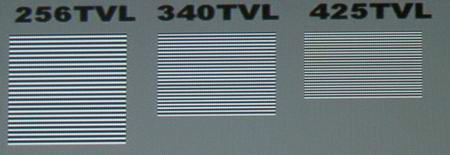
Only in the highest resolutions (few lines) light fluctuations could be seen: every second line appeared greyish and thicker.
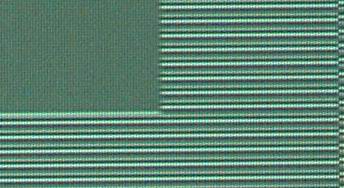
Such small fluctuations under resolutions which are rarely used by DVDs will have no effect during movie use.
The detail reproduction of the Z4 is outstanding in all ways. Using the default settings, there is a tendency towards haloing, but once calibrated, the projector reproduces even the smallest details on the screen in full dynamic range without any annoying edge halos. Especially astounding is the colour reproduction in small details – even using HDMI, there is not much that can be improved. The fine scaling which almost imperceptibly converts the PAL signal into the native resolution of the projector concludes the outstanding impression this projector gives you. Together with the signal processing, the end result is a sharp and detailed movie image which reproduce even the smallest of objects faithfully.
Notes:
-
With sources in the 4:3 "television format", part of the horizontal resolution remains unused. Like a conventional 16:9 TV, black bars are present on the left and right side of the image. The "left over" resolution of 960x720 pixels is still quite a bit higher than our PAL standard so even with 4:3 material, the reproduction of details does not suffer.
3.10 Shading (Know
How Link here)
The most notable deficiency of the Z3 was probably its fairly obvious shading. Depending on the iris settings, many projectors have a tendency to shade parts of their images in hues of red or green. The shading is noticeable in many cases, including movie use.
The Z4 preproduction unit showed that the engineers had already improved this area quite a bit. The finished product, which is the basis for this review, has been improved even further: even in the most difficult test images, we couldn't find any unintended colouring around the corners. For normal movie use, this means that the colour temperature is uniform throughout the whole image and does not exhibit any artifacting.
3.11 Vertical Banding
In the case of vertical banding, a new positive development has turned up: even though the preproduction unit had a visible case of banding (which could be corrected), it is greatly reduced in our review model. Even in one-coloured images, it's barely visible. During normal movie use, the projector is free from vertical banding, even during soccer transmissions!
3.12 Image Conclusions
As the predecessor the PLV-Z3 has already shown, there is a lot of unused potential to be found in the LCD technology. Like the majority of the competition, it was only clearly surpassed by the Sony VPL-HS50, which cost around 1000€ more. The engineers at Sanyo seem to have reached the same level with the construction of the Z4 though, because in almost every respect it is equally good:
The already very good colour range typical of LCD projectors is noticeably improved in the Cinema mode's secondary colours. Further potential for improvement exists in the Colour management which until now could not be found in consumer products from Sanyo. The contrast has been improved, by using the new D5 LCD generation as well as through the incorporation of an adaptive iris shutter. This has resulted in a more three dimensional image, darker black levels and an increased maximum brightness. Combined with an accurate colour reproduction, the final image looks exactly like it should. The pixel grid is the only part which could be improved.
The variable overscan ensures that the whole source image reaches the screen, and the well-functioning de-interlacer works with video as well as with film material. The signal processing and scaling are both at an outstanding level for this price class. During movie use, this results in a presentation which is both very sharp and detailed. The improved optics has few convergence issues and once more improves slightly upon the detail reproduction. Last but not least, the new LCDs have finally made it possible to reduce artifacts such as vertical banding and shading to imperceptible levels.
The single bad apple in the bunch is white balance which will result in slight discolouring unless professional measurements are made, and the partly perceptible changes in brightness of the adaptive iris shutter when going from bright to dark scenes.
To conclude our image impressions, we have hooked up several different HDTV sources to the HD-ready projector to make full use of its potential performance. Also here, the results were impressive in every way. All the technical strengths mentioned above result in a movie experience which leaves little to be desired on points such as three dimensionality and repoduction of fine details. During broadcasts of sports games, even the smallest details among the audience, shapes in the grass, even faces become recognizeable. Movie material retains a sharpness which you will rarely see even in theaters. This whets the appetite for more HD content and makes the wait for official implementation of HDTV in Germany even more unbearable.
The Sanyo PLV-Z4 shows clearly that the LCD technology, which has often been ridiculed and labeled as a poor man's choice, not only stacks up to but even surpasses its competitors. It should be noted though, that the image depth of good DLP projectors has not been reached in spite of the Z4's high level.
|
Image evaluation total : 1,7 (Good +) |
|
|
Black level & contrast |
1,25 (Very good -) |
|
Sharpness & interpolation |
1,5 (Very good -) |
|
Colour range / -temperature |
1,4 / 2,1 |
|
De-interlacing |
2,2 (Good -) |
|
Other aspects |
1,7 (Good +) |
(All evaluations are based on the projection type and the current state of the technology in use. A direct comparison between the different types is therefore only partly usable)
4. Conclusion
The PLV-Z4 has quickly made it clear that Sanyo in many cases has endeavored to meet the growing demands of many hometheater fans and improve upon the Z3 without raising the price it had initially. In most cases, they have reached this goal. The result is a projector which not only is worth its price, but also is improved in key areas and has eliminated larger deficiencies completely.
This begins with the much improved construction and design, which together with the automatic lens shutter and the hurricane blower helps keep the LCD panels clean from dust. In this price class, these are extraordinarily genereous features. The enlargened chassis is even more optimised for minimizing noise which makes the Z4 one of the most quiet projectors on the market in eco mode.
Also in things like positioning the projector, improvement is present: The new optics allow for better sharpness and larger zoom range which makes placement of the projector child's play in any room. The mechanics of the lens shift got a make-over and are now precise and lockable. This means that slight vibrations no longer will be able to change the image alignment.
Operating the projector has been made simpler and more logical through a graphically pleasing and easily navigateable menu. Progress has clearly been made here. Sorely missed is the excellent remote control of the predecessors'. Still, the new one works fine and offers enough functions as well as backlit buttons. The number of functions available in the menus is so massive that even experts will find little they lack. They allow the user to adjust for any eventuality and to any taste. It could be criticized that this abundance almost is an overkill for most laymen and will result in a longer period of learning to operate the projector. Still, this is not judged to be a disadvantage by us: the more functions a projector offers, the better it can be configured. All in all, the PLV-Z4 convinces with image quality which until now wasn't available at such a low price.
In light of all these innovations and advantages, the PLV-Z4's price tag of under € 2000.- is a really good and future proof purchase which in every respect is worth the surcharge compared to the Z3.
We warmly recommend that you demo it at your nearest hometheater store and end this review with the words of Siskel & Ebert: Two Thumbs Up!!
+ Good construction
+ Silent cooling
+ Great setup flexibility
+ Few LCD artifacts
+ Many settings and options
+ Very good detail reproduction
+ Cleaning system with bellows
-
Activity of the adaptive iris shutter is noticeable
-
Visible pixel structure
-
White level not completely uniform
-
Overscan during analogue playback
|
Evaluation total: 1,5 (Sehr Gut -) |
|
|
Features |
1,3 (Sehr Gut -) |
|
Operation |
2 (Gut) |
|
Technology |
1,4 (Sehr Gut -) |
|
Image |
1,7 (Gut +) |
|
Price / value |
1,0 (Sehr Gut) |
(All evaluations are based on the projection type and the current state of the technology in use. A direct comparison between the different types is therefore only partly usable)
1. Oktober 2005, Ekkehart Schmitt
Translation: Jens Mogensen
6.
Technical details (according to the manufacturer):
- Category: Home Cinema
- Panel: 3 x 0,7“ TFT p-Si (16 : 9)
- Lamp: 145 W UHP
- Brightness in ANSI Lumen: 1.000
- lamp life: 2.000 h (Normal Mode), 3.000 h (Eco)
- Fan noise: 22 dB (Eco, Lamp mode theater black)
- Standard lens: F = 2,0 – 3,0 / f = 21,3 – 42,6 mm
- Lens zoom range: 1,36 – 2,76 :1
- Throw distance: 1,2 – 9,2 m
- Contrast ratio: 7.000 :1
- Resolution in pixels: 1.280 x 720 (HDTV)
- Horisontal resolution: 400 TV Linien
- Illumination: 85%
- bandwidth / frequency: 100 MHz, horisontal sync range 80 kHz, vertical sync range 100 Hz
- Colour system: PAL, SECAM, NTSC, NTSC4.43, PAL-M/N
- Connections: input 1: D-Sub15 (RGB/SCART-RGB); input 2: HDMI; input 3: 1 x phono Composite); input 4: 3 x phono (Y-Pb/Cb-Pr/Cr); input 5: 3x phono (Y-Pb/Cb-Pr/Cr)
- Control input: Mini-DIN 8-pin (RS232 compatible)
- Keystone correction: vertical +/–20°
- Lens shift / U/D-Ratio manual –1 vertical – center – +1 vertical +1/2 horisontal – center – +1/2 horisontal
- Vertical resolution TV signal: 480i, 480p, 575i, 576p, 720p, 1.035i, 1.080i
- Computer compatibility: W-XGA / S-XGA / XGA / S-VGA / VGA / Mac
- Zoom / Focus: manual / manual
- Power use / voltage: 210 W / 100-240 V
- Size (W x H x D) in mm: 382 x 126,8 x 304,3 mm
- Weight: 4 kg
- Standard accessories: IR-remote control (backlit) incl. batteries, power cable (2 m), composite cable (phono x 1), manual, tiny bellows.
- Optional accessories: Mac / VGA Adapter, SCART / VGA cable