Test: LCD projector
Worthy successor to the well known TX100?
In the middle of last year,
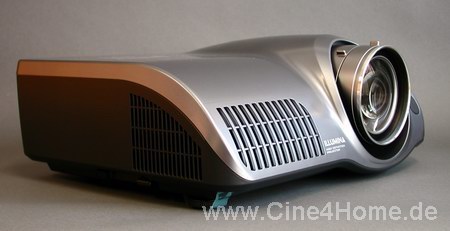
The manufacturer took their time (about one and a half year) to release a successor of their first projector. The "New One" was released in time for the Christmas holidays, and was unsurprisingly named: PJ-TX200.
On the outside, the differences between the TX100 and the TX200 are far from obvious. Especially the guts of the new machine (i.e. light engine and electronics, and with them the quality of the image) had to be brougt up to the state of the art. After the good experiences we had with its predecessor we were particularly interested in this machine, and are presenting our impressions and measurements in this detailed review.
For our test criteria, we refer to our detailed Know How Special: "Projectors / Plasma TV's - Quality aspects".
1. Equipment and Technology (Know How Link here)
Even

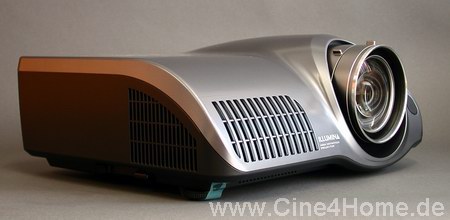
Besides minimal changes the housing color was changed into anthracite coal with a pale blue shine. To our eyes, the new color succeeded very well and gives the housing a high quality appearance. The curved lines give the PJ-TX200 a modern design look, making it appear substantially more expensive than it actually is.
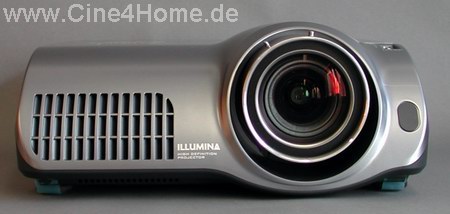
The build quality and used materials of the projector are excellent, and leave us nothing to wish for.
1.1 Technology (Know How Link here)
One of the main technical changes is the use of the new Epson D5 LCD panels. As opposed to the D4-generation, the new panels offer a better fill rate and thus show less pixel structure and higher contrast.
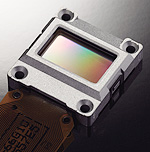
To which extent the improvements in the image quality can actually be attributed to these new panels, we examined in our tests of other current D5 projectors. We will repeat our findings in this test however. The native resolution of the display remains 1280 x 720 pixels, corresponding to the small HDTV standard. With it's digital connections the PJ-TX200 is officially HD-ready.
The light source hasn't changed much, as Hitachi used the same 150 Watt UHP lamp with a life span of 2000 hours and replacement price of under €300,--; a price\performance ratio that's very difficult to beat.
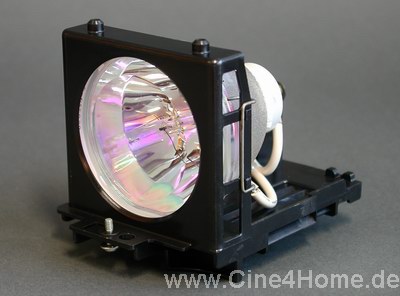
The lamp can be accessed for replacement on the bottom of the projector. After loosening a few screws the lamp module can be taken out without much effort. An electronics degree should not be necessary.
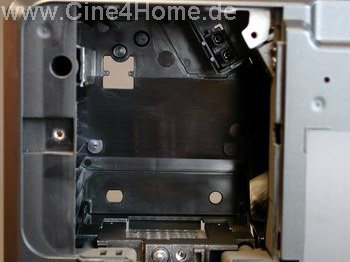
Opened lamp pit and beginning of the optical path (down)
The ventilation system was also copied from the PJ-TX100. Cool air is taken in on the left side of the projector, led through and blown out again at the right front corner.
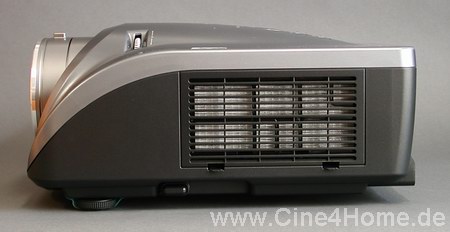
Air is sucked in on the left (picture above)...
and exhausted in the front (picture down).
This design offers two substantial advantages: the first is flexibility in placement. Since no air is sucked in at the back, the projector can be placed close to the wall, even on a shelf. Only to its left should you keep a safety margin.
Exhausts of the PJ-TX200
The warm exhaust air to the front presents a risk in that disturbing heat waves could be seen (for example as with the Sony HS20).

The second advantage is quiet operation. Like all present LCD projectors the TX200 is pleasantly quiet and does not disturb your viewing pleasure in any way. The exhausts are optimized for noise control and offer sufficient air circulation even in whisper quiet operation.

"Fan" of the TX200
However, in continuous operation a disturbing fault became apparent with its predecessor, the TX100: often, a spec of dust would find its way into the light engine, settle on one of the three LCD panels and thus make dust blobs visible. Later, the dust collector was improved (Cine4Home reported on it), but the problem remained to some extent. The engineers improved the TX200 on this issue however and integrated a new filter in the TX200.

The new dust filter of the TX200
The new filter is designed to electro-statically draw in the dust like a magnet and eliminate the dust problem once and for all.
Electrically charged air filter
As with all filters, the filter of the TX200 should be cleaned regularly. To do this, the filter should be taken out of its holder which can be done swiftly and easily because of its position on the left side of the TX200. Particularly users with ceiling mounted TX200's will quickly appreciate not having to take down the projector from its mounting plate.
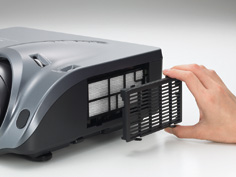
Easy filter cleaning
Altogether, the ventilation system of the new Hitachi PJ-TX200 appeared exemplary in our test. How it will perform in continuous operation will be determined in the next few months. However, the efforts of the technical engineers should be highly regarded.
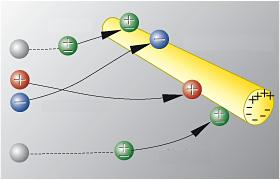
The technical data of the TX200 promise us great advancements in contrast ratio compared to its predecessor; the TX200 reaches a contrast ratio up to 7000:1, about 6 times the contrast ratio of the TX100. This high value is obtained by use of an Adaptive Iris, a common technique in today's LCD projectors. It adapts to the picture automatically: on dark scenes it closes and provides a good black level, on bright scenes it opens and provides a high brightness. In addition, the proven Iris Control was integrated into the optic path, allowing the user to adjust Contrast and Brightness to the their requirements and room characteristics. As with the Sanyo Z4, a tandem of Iris Control in the optical path and Adaptive Iris behind the lamp is created.
The two Iris-es in a schematic representation
The sketches show the positioning of the two iris controls: one at the beginning, the other at the end of the optical path.
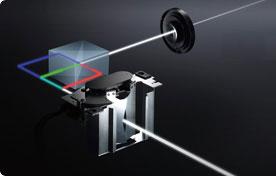
Naturally, we examined the functioning of the new technology "in action". With a screwdriver and support from Karsten Becker (www.dvdplayer.de) we looked at the inner workings of the TX200.
After opening the cover a first view of the well structured inside: in the picture the power pack (in front), the electronics (rear right) and lamp chamber (at the rear left).
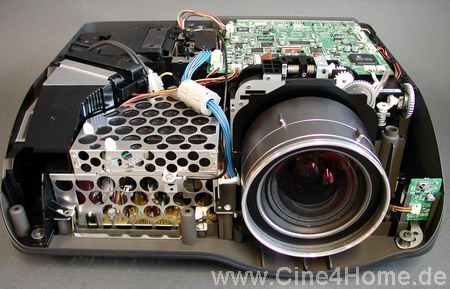
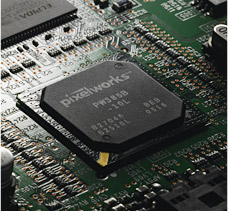
The main component for image processing remains a chip from Pixelworks, a manufacturer that can be found in nearly every LCD projector nowadays.
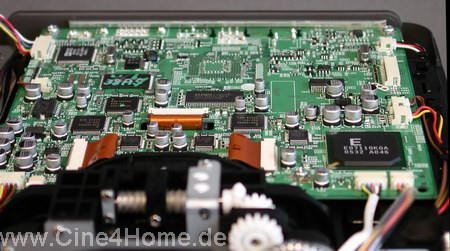
Image processing with Pixelworks chip
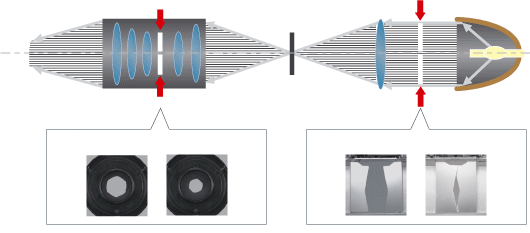
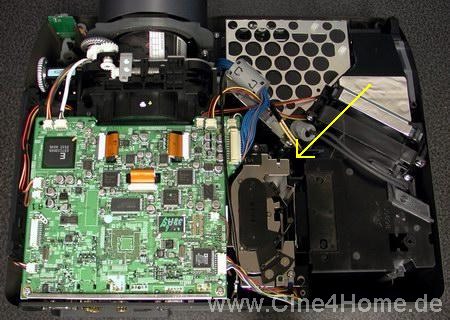
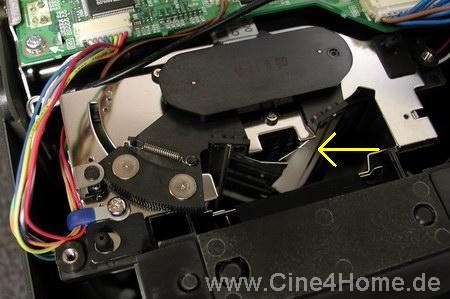
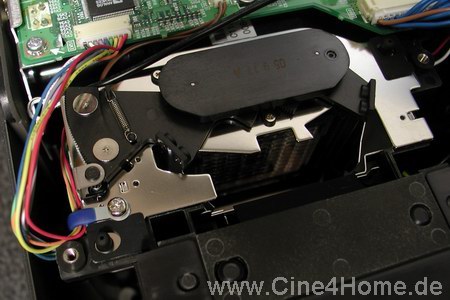
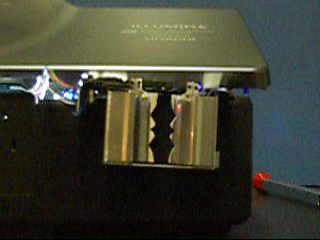
A view from directly above betrays the exact position of the adaptive iris, which can not be overseen due to the extremely large mechanics (arrow).
With a diagonal view the function can be recognized: the two doors open in bright scenes and close in dark scenes.
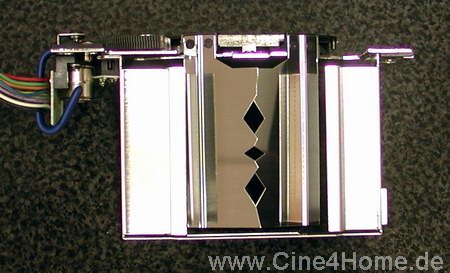
Above, closed iris.
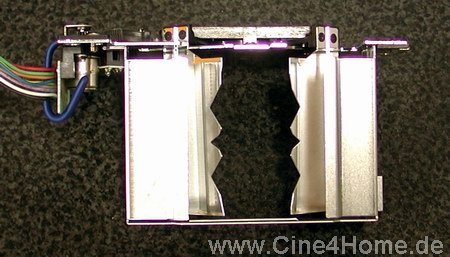
Below, opened iris.
The difference becomes even more clear with the iris detached. In the closed condition the iris is almost perfectly closed but for a few "light holes".
When the doors open, they come out so far that they are no longer in the optical path of the light engine. The maximum quantity of light is fed into the optical path and on the screen.
Crucial for the quality of a variable iris is how inconspicuous it works. An important aspect in this is the speed of the adaptive iris. How quickly can an iris as big as the TX200 one work? As with the Z4 we recorded a small video, and observed the iris during a typical movie scene.
Click on the picture in order to start the video!
In the video can be seen that the iris is astonishingly fast considering its size. Our Image tests will show whether or not the speed of the iris remains unnoticed during movie viewing, however. Different other factors, like real time gamma adjustment, also play a large role here.
In all the technical build of the Hitachi TX200 is well thought out and of high quality. The concepts of its predecessor were used to a large degree, and at times improved upon where needed.
1.2 Connections / Signal types (Know How Link here)
The TX200 differs only slightly from its predecessor on offered inputs. As with most current projectors, the DVI input has been replaced with a HDMI input. This of course increases the number of digital signal types, but the reliability of the HDMI plug could be improved. For this projector we therefore recommend fixed installation if possible.

In addition to the digital HDMI input, the following inputs are available:1x YPbPr (Cinch), 1x S-Video (Hosiden), 1x Composite (Cinch), 1x Computer RGBHV (Sub-D). The TX200 is equipped for all relevant connections. A serial interface and a trigger signal have also been ported from the TX100, so the projector can be integrated very well in elaborate control concepts.
All relevant types of signals are processed: NTSC 480i/480p, PAL 576i/576p, HDTV60 720p/1080i and HDTV50 720p/1080i, as well as numerous PC resolutions (VGA, XGA, WXGA etc.) which can be fed in both analogue and digital form.
1.3 Setup (Know How Link here)
The TX100 impressed us with its flexible positioning capabilities. As there was no need for improvement on its predecessor, very little has changed in this regard on the TX200. The large "eye" of the projector, the optics, permit a comfortably large zoom range, suitable for almost any home theater.
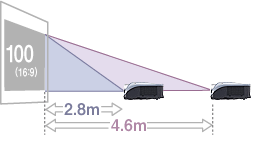
2,54m diagonal: 2,8m to 4,6m variable zoom range
Large diagonal images in small rooms are possible by table placement in front of the viewer as well as by ceiling placement over or behind the viewer. The feet of the TX200 are adjustable in height to facilitate level placement.
Projection distance table:
Image diagonal |
Projection distance (min.): |
Projection distance (max.) |
| 30" (0,76m) | 0,8 m | 1,3 m |
| 60" (1,52m) | 1,7 m | 2,7 m |
| 100" (2,54m) | 2,8 m | 4,6 m |
| 150" (3,81m) | 4,3 m | 6,9 m |
| 200" (5,08m) | 5,7 m | 9,2 m |
In addition to the excellent zoom range, the projector offers double lens shift, enabling you to shift the image both horizontally and vertically without distortion of the image.
The lens shift mechanics with adjustment wheels
By turning the adjustment wheels adjacent to the optics the image can shift up-down about 3/4 of the image height, and 1/4 of the image width. This enables the user to place the projector away from its optical axis, for instance on the right side on a table or left next to the sofa.
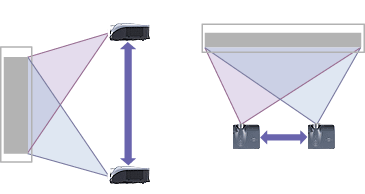
Large positioning range of the TX200
With placement flexibility the strengths of the optics come into play: its very high quality ensures good image definition and sharpness on the entire image when using lens shift.
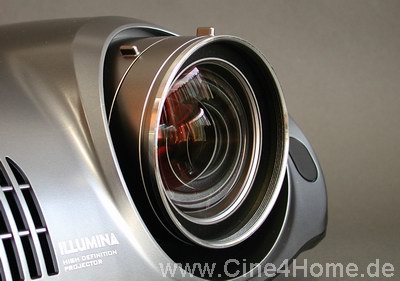
The large, high-quality optics of the TX200
Sharpness and zoom range can be adjusted manually with the rings on the optics. The large size of the optics make adjustment very easy.
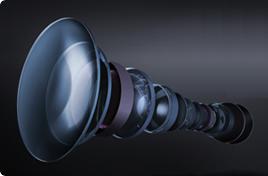
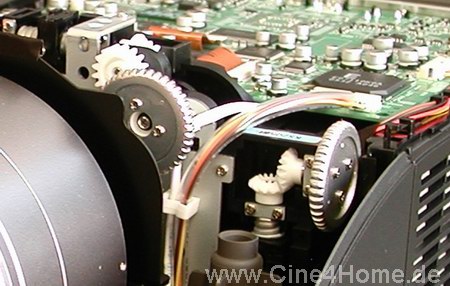
The complex internal structure of the optics with many lenses
The placement flexibility of the TX200 is exemplary, and in most rooms the user will have no problem at all with placement of the projector. Only the Sanyo Z4 outperforms the TX200 in this area, offering an even greater zoom range.
2. Operating the projector (Know How Link here)
Now we shift our attention to the control the TX200: again, its predecessor was well thought through and practical, so with the TX200 only minor improvements were necessary. The engineers concentrated first and foremost on making available even more and more precise parameters.
2.1 Remote Control
The remote control remained unchanged compared to its predecessor. It is small in dimension and comfortable to hold. For all substantial functions a direct selection key is available, also for selecting individual input sources (DVI, component etc.) directly.
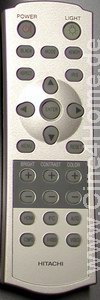
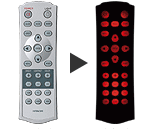
In dark rooms an electrical (orange) backlighting of all keys can be activated. The transmission range of the infrared transmitter is good and functions over larger distances, even when reflected off of the screen.
As an alternative to using the remote control, the projector can also be controlled directly on the machine. This can be quite useful, for instance when placed on a table in front of the viewer. The most important function keys are placed on the top of the TX200.

Control keys on the machine and remote control in an overview
2.2 Menus
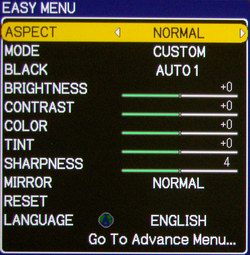
As explained before the menu concept has not changed very much, but was merely extended with some new functions. All of the required parameters are sorted into 7 main functional areas.
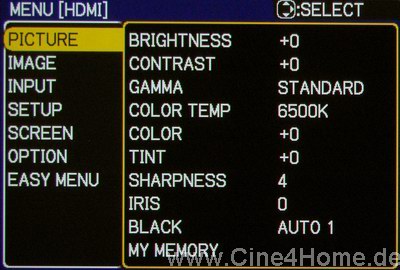
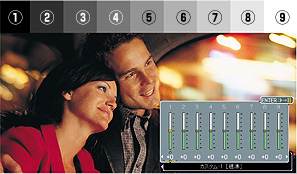
In the first "Picture" menu option (see image above) all relevant image parameters are summarized. Apart from the typical built-in functions (Brightness, Contrast, Color etc..), the parameters for manual iris and adaptive iris can be found here.
Regular readers of our site will know that the parameters for adjusting gamma and color temperature are particularly important. Here, the TX200 does not disappoint: technically precise and in understandable terms the user can select a color temperature from different factory settings:
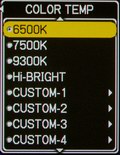
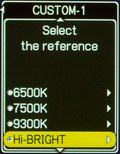
The crucial one for movie representation is the 6500K-setting; during our test we will determine how precise it actually is. In addition to the presets, four different memory locations are available for user defined settings. If a user defined preset is chosen, a reference color temperature can be selected first:
In the next step, the basic color distribution between red, green and blue can be changed by a kind of Equalizer.
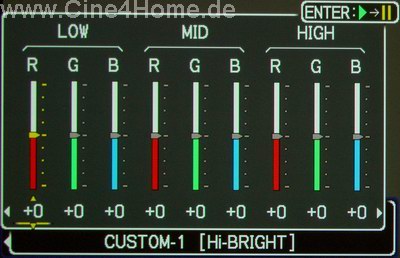
The RGB Equalizer of the TX200
Compared to its predecessor, the "MID" control sliders were added, which allow color balance control in the middle brightness region. The precision of the setting is increased greatly. No other projector in this price range currently offers this setting.
Equally unique is the gamma function of the TX200: under the "gamma" menu option, different presets can be selected to start with. Unfortunately the presets are not precisely described.
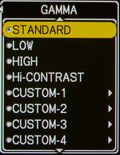
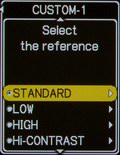
During the image test, we will examine which preset corresponds to which gamma curve. We suspect that "Standard" corresponds to a gamma curve of 2.2. Four different user defined presets are at the disposal of the user for the gamma setting. Again, a reference must be selected first before proceeding.
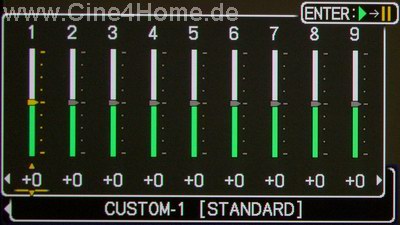
After selection of the reference setting the brightness distribution can be adjusted independently with a practical Equalizer in nine (!) different ranges.
Practical gamma equalizer
During our test we will again provide more exact information about the possible outcome.
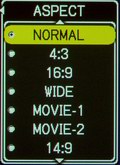
The second "Image" menu option offers many practical parameters for the adjustment of the image aspect, over scan and image position.
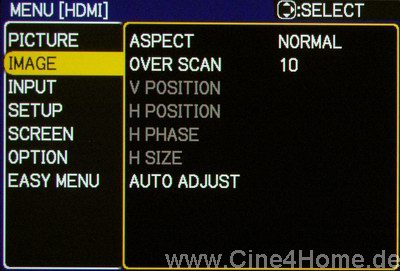
Under Aspect, seven different options are
available to the user
Under the third "Input" menu option, numerous parameters for the adjustment of the signal input are offered; from the black level of digital signals in the de-interlaced mode to the signal type being fed over the component inputs, all can be adjusted precisely.
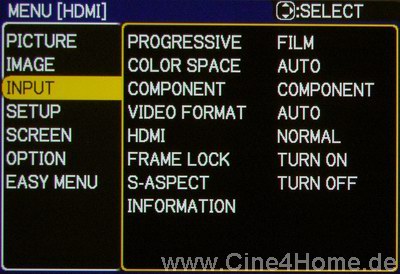
The function "Color space" is particularly interesting, which actually would have fit in the "Picture" option. Different color spaces can be selected, depending on the used source.
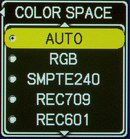
If this function works as described in the technical description, it would be a crucial advantage compared to other models currently on the market. More on this in our image test.
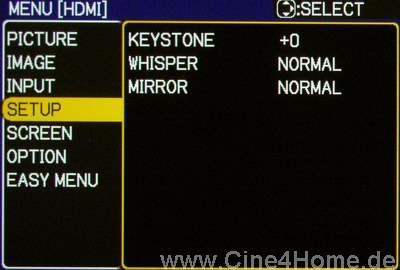
Option number 4, "Setup", contains only image adjustment functions which are necessary at the time of installation. Here, front- or rear projection can be selected, as well as keystone settings in the rare case where the projector must be placed in an angle towards the screen. Also the lamp saving Whisper-mode can be activated here.
The "screen" option is somewhat misleadingly named: it has nothing to do with the screen being projected upon, but relates to the On-screen menus.
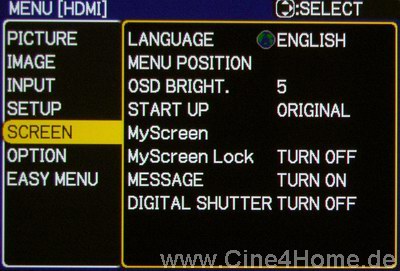
Most functions offered here are more for playing around with than they are of any real use. New is the "Digital Shutter" function, which in practice is nothing more than a blanking to 21:9 format, however.
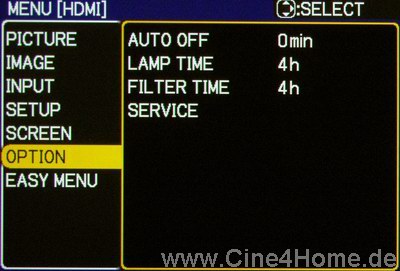
Additional options can be found under the "Option" menu. Apart from information on lamp time and filter time, the new service submenu has been integrated here.
A few functions of the Factory menu were transferred to the service submenu. A really smart and meaningful decision, which unfortunately was not followed thru consistantly enough.
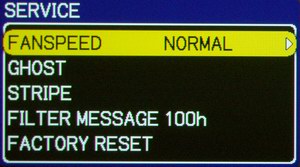
The service submenu
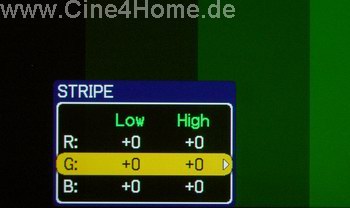
A function for minimizing Vertical Banding (VB) was integrated here, however not all parameters were transferred from the Factory menu, giving the function only limited influence.
It seems however that the TX200 does not suffer from Vertical Banding out of the box, so the relevant functions do not have to be used. More on this in our image test.
Those who find the Menu structure above too complex can switch to the “Easy Menu“. The Easy menu is limited to the most essential functions and summarized these on one page without any difficult technical terms.
Altogether, the operation of the TX200 is one of the most exemplary a modern projector (within the same price range) can offer. It shines with a reliable remote control, is very well thought out and nearly unbeatable in the offered adjustment options. The beauty here is the good arrangement and technically sound function of the parameters. Operation can hardly get any better. With the Easy menu, even the layman, who doesn't want anything to do with "Tuning Orgys", was thought of.
3. Image test
IIn these first two chapters the TX200 impressed and convinced us. Now, we will take a look at the image quality. :
3.1 Screendoor / Pixel structure (Know How Link here)
The new D5-generation LCD-panels were designed to eliminate or at least lessen a known problem of the LCD technology, the visible distance between pixels. As with all current models, the enhancements when making a close comparison to older generations is visible, but hardly revolutionary.
![]()
Visible pixel structure of the D5-panels
The screendoor effect should not be overestimated with a 1280 x 720 HD projector, however. On appropriate viewing distances (approximately twice the screen width) the pixel structure of the projector can hardly be seen at all.
3.2 Color Space (Know How Link here)
As we already mentioned in the "Control" chapter, the engineers of the TX200 thought of something special in regard to the color space settings: in the menu, different color space settings can be set, each with its own technical precise description.
All these options show different settings between primary and secondary colors, non of them fit our PAL or HDTV standard however.
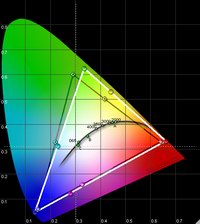
Above: color space "RGB", as used with DVI
Below, from left to right: "Rec709", "Rec601", "SMPTE240", for HDMI YUV or analog
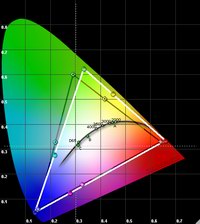


As can be seen in the images above, none of the color spaces (white triangle) matches our PAL standard (black triangle). Especially green is over-saturated, causing some nature-shots to look unnatural. The secondary colors are tuned quite well in some modes, except for Magenta which appears too blue-ish in all modes.
With the aid of different image parameters, an optimized D65 temperature and measuring instruments, the color space can be tuned quite nicely, which is remarkable for an entry level projector.
Example: color space optimized for HDTV
The example above shows that primary and secondary colors can be aligned to the HDTV-color space, for example. It would have been even better to obtain these results out of the box, as very few buyers will have access to the necessary measuring equipment.
3.3 Color Temperature (Know How Link here)
The same applies to the color temperature with neutral grey bars: the better it is tuned to our video standard, the more accurate and believable the color reproduction in the image. Here too, good out of the box settings are extremely welcome, as they relieve the user of the difficult task of tuning.
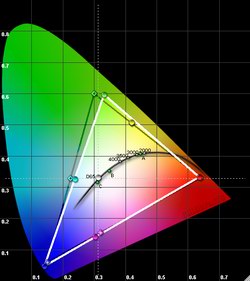
As with the color space settings, the TX200 offers different presets for color temperature, each described technically correct with its temperature: 6500K, 7500K and 9300K. The for Home Theater relevant settings is 6500K (D65), as this is in line with the video standard. Our measurements of these presets show that the out of the box settings of the TX200 are close to the video standard.

The image above shows the image brightness on the X-axis (from dark (left) to bright (right)), and the deviation of the primary colors from the optimum (middle equals 100%, no deviation). The projector shows an excess of blue over nearly the entire range, whilst red and green are almost perfectly aligned.
About 1000K too cool.
For the home theater image this means that the color reproduction is a little bit too cool, thereby making especially natural parts of the image, for instance faces, too cold. All this is within an acceptable range for out of the box factory settings.
On a side note: in the TX200, changes in the variable iris also make a difference in the color temperature to a very slight degree and only in the dark color ranges. To be complete, we have also measured the color temperature of all other presets.

Above the "7500K" preset, below "9300K",
both are far from the supposed value.
Settings like the "6500K" preset of the TX200 are very useful and offer quite good image quality. Those who want or require more precision can optimize the colors by using the Image-menu (or have a local dealer optimize the image). The TX200 offers a unique concept in addition to the normal gain- and bias adjustments: RGB adjustment for the middle brightness range.
The RGB-equalizer of the TX200 with additional MID-range
One could think that the new concept offered here makes it more difficult instead of easier to obtain the desired results. In our practical tests however this proved not true, however: the ease with which the TX200 could be tuned to a D65 curve can not be matched by many projectors: simply tune White with the HIGH-levers, then adjust mid-grey with the MID-sliders and last, adjust the lower grey scale with the LOW-sliders. The different ranges interfere only slightly with each other, so in our test we could achieve an almost perfect result after only a few minutes.

Only in the range below 20IRE the projector displays the for LCD typical emphasis on blue. This is normally not relevant however, because the human eye reacts less on color differences in the darker range as it does in the brighter ones.
On the whole, the settings for the 6500K-presets and the offered options for adjustment later on can be qualified as good, certainly for an entry level projector as the TX200.
3.4 Black level, Contrast, Brightness (Know How Link here)
At present, manufacturers over-bid each other with higher and higher contrast ratios in the technical data sheet, but rarely these high values also offer corresponding improvements in image plasticity. High contrast ratios are achieved in LCD projectors with the aid of an adaptive iris, which adapts automatically to the image the projector is displaying. But only a well thought out system of an inconspicuous adaptive iris and appropriate gamma adjustment can affect the image representation in a positive way.
The TX200 is also equipped with such an adaptive iris, as was explained in the Technology-chapter. In addition to the adaptive iris there is a second iris in the optical path, in the focal point of the projection optics to be more precise. It can also be adjusted, not automatically however but by remote control in eleven stages. When closed (0), it filters out light from the picture and thus increases black level and contrast. When opened (10), the maximum possible brightness is used, in order to obtain as much light as possible onto the screen. With these aids it is possible for the user to adjust the amount of light and contrast according to his personal preferences and room requirements. Next to the TX200, only the Sanyo Z4 offers this clever concept.
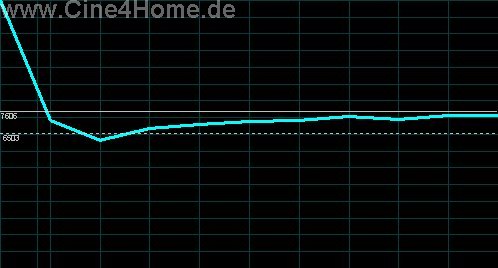
The manufacturer indicates a maximum contrast ratio of 7000:1. When using adaptive iris it is easy to obtain such a value: close the iris to such a degree that the computational ratio between black level and maximum brightness is at its highest. In these far ends of its operating ranges, an adaptive iris only rarely works inconspicuously. The technical engineers apparently came to the same conclusion, because in the Picture-menu they have offered two different iris-modes: "Auto1" and "Auto2". If necessary the adaptive iris can also be switched off completely.
In the "Auto2"-mode, the projector actually reaches a contrast ratio of 7600:1. The high value however is reached only with a) a wrong color temperature and b) a clearly visible functioning of the adaptive iris. The image exhibits flickering on dark scenes with many changes in brightness, as if there is something wrong with the lamp. This mode should therefore be seen only as a marketing ploy to ensure the high value of the technical data.
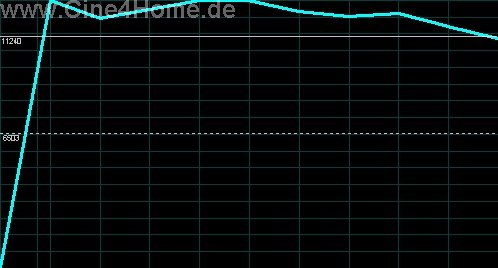
Of more interest is the "Auto1" mode. The adaptive iris works much less aggressively now, i.e. it doesn't close as far and also doesn't make any large (and visible) changes. The "Auto1"-mode is quite useful for film representation. In most scenes the iris functions almost invisibly, only with sudden changes from bright to dark a minimal delay can be recognized, which critical viewers might find distracting. This happens only rarely however, the advantage the adaptive iris throws to the scale is an outstanding black level in dark scenes and maximum brightness in bright scenes. All scenes achieve a very engaging and believable picture depth, without "nebulas" in dark scenes or lack of brightness in bright scenes. The contrast ratio we measured is equally good: up to 3100:1 in Auto1 mode, albeit with the wrong color temperature. With a color temperature of 6500K (video standard) a contrast ratio of 2000:1 remains (with closed optical iris). This is an outstanding value in today's LCD technology, and even surpasses competitors such as Panasonic or Sanyo.
Even with a de-activated adaptive iris, the projector shows a very good contrast ratio with correct colors: up to 950:1 can be achieved. The system offered here, consisting of adaptive iris, optical iris and various adjustment possibilities for the user prove to be universally suitable for every taste. Bright pictures, good black level, high contrast, all this is possible with the TX200. In addition to all this the in-image contrast makes the on-screen image of the TX200 very impressive. With regard to picture depth the TX200 is clearly one of the front runners of the new LCD generation.
3.5 Luminance tracking / uniformity (Know How Link here)
The depth of the image is not only defined by projector construction, but also a matter of settings. By this we mean the tuning of the brightness distribution, it describes the ratio between actual output brightness and signal strength. Current DVD-recordings display a curve rise of 2.2, in practice however a value between 2.2 and 2.5 (depending upon room conditions) will get the best results.
As with color temperature, the TX200 offers a number of presets for Gamma adjustment: "Standard", "Low", "High" and "Hi-Contrast". Unfortunately, they are named not as technically correct as was the case with the color temperature settings. We can assume that the "Standard" settings is close to the video norm. This assumption is confirmed in our measurements.
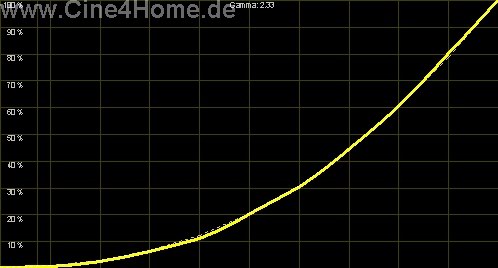
Gamma curve of 2.33
The curve of just over 2.3 is a value that will perform well in just about every room, achieving a good depth of image. The coloration in dark images is good, without losing detail.
Of additional interest is the "Low" preset. Here one expects a flatter gamma curve that enhances darker details, but on the whole makes the image appear more washed out. Our measurements have shown however that the technical engineers encountered this with a plomb: indeed the details of the darker range are enhanced making it visible also in rooms with scattered light. In the middle part however the curve changes into 2.5, exhibiting more coloration and a steeper rise as in the "Standard" setting with our test projector.
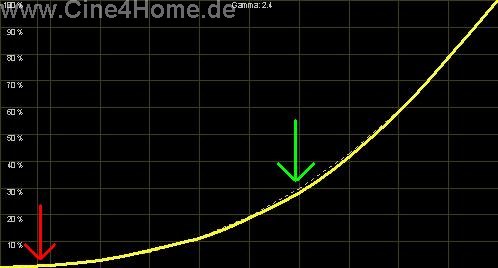
Low-Preset: More details (red arrow),
steeper rise (green arrow)
With a curve value of about 2.4, the "Low"-preset leads to good results on the screen. Personal taste is the deciding factor here.
The measurements above were all conducted with full-image grey scales. The curve results were not influenced by adaptive iris, i.e. the results were the same on adaptive iris settings "Off" and "Auto1". But is there a difference when using the so called Window-grey scales, with which a large part of the image remains black and the grey scales appear within a window?

Grey scale test image as "Window"
This kind of test image, mostly used with CRT projectors, gain a new meaning in the era of adaptive iris: with adaptive iris turned off, the gamma curve remains the same, regardless of using full-image of window grey scales. With adaptive iris engaged it is a different story: the projector analyzes and recognizes a high presence of black in the image, and closes the iris to a certain degree to enhance the black level. This procedure however has an influence on the entire image, according to whether and how real time gamma adjustment takes place. In our test of the Sony VPL-VW100 we already took a closer look on the procedure.
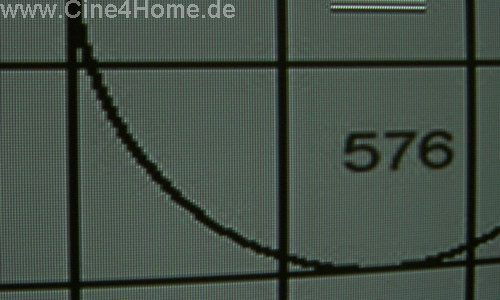
With the TX200 it appears that the image is not altered to a large degree by the gamma adjustment, so that the adaptive iris has a certain effect on the gamma distribution. If we measure the gamma curve again, "Standard" preset with Window grey scale, the rise in the gamma curve is considerably steeper:
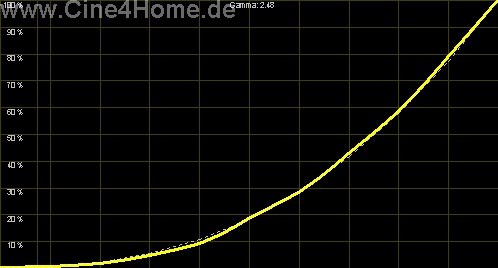
The curve does not correspond to 2.33 any longer, but is now 2.48: the curve becomes steeper because of the adaptive iris. Fortunately this value is still within the tolerance range between 2.2. and 2.5 and does not work out negatively. Nevertheless: a better real time adjustment of the brightness distribution (as with for instance the VPL100) would make the adaptive iris invisible with fast changes from bright to dark, and would eliminate the at times annoying flickering. Here the engineers have some room for improvement with future models.
Also the "Low"-setting is affected from image content and the adaptive iris. With windows grey scales we measured a curve rise of 2.55, again somewhat steeper as the "Standard" preset, however with better dark details.
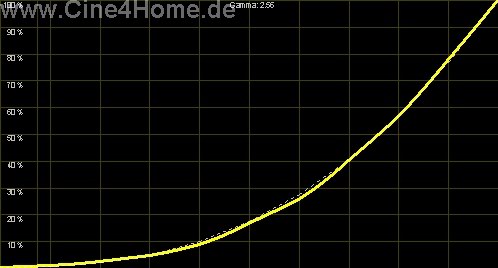
Gamma "Low" with adaptive iris and Window-test patterns
As can be seen, the new adaptive iris technology raises many new observations and questions. Without a doubt it contributes to improvements in the image (better black level in dark scenes and more light in bright scenes), but its method of operation and its inconspicuousness depend largely from the programming of the technical engineers. Cine4Home will develop new test methods and images to reveal the method of operation of the different solutions.
The beauty of the TX200, as with its predecessor, is the many options of adjustment to the user, which are even increased compared to the TX100. The new model again offers a gamma equalizer to adjust different brightness ranges independently, but now even more sliders are available:
Gamma-equalizer with nine sliders
The concept of the equalizer is as simple as it is ingenious: each slider corresponds to a different grey tone, a certain brightness range.
A grey scale can be blended into the picture at any time with the remote control, thus supporting the tuning and functioning of the equalizer intuitively (see picture above). For technically advanced readers the following diagram will explain the gamma curve adjustment further:

The diagram shows the ranges of the different sliders in the gamma curve. As can be seen, the equalizer enables the realization of just about any gamma curve, from flat to steep. For the end user it becomes possible to perfectly adjust the gamma curve to his personal preferences and room requirements. More dark detail is required? Simply adjust ranges 1-3 with the corresponding sliders. The image leans toward clipping? Adjusting slider 8 for instance could improve this etc. etc.. We consider this concept to be extremely exemplary because of its comprehensibility and versatility, and wonder why no other manufacturer has copied this method.
On the whole, the TX200 is without competition when it comes to luminance tracking. No other currently available D5 LCD projector offers this kind of versatility in adjustments. In relation to its good presets the projector is exemplary. The only negative here is the gamma change because of the adaptive iris.
3.6 Sharpness / Brightness uniformity / convergence (Know How Link here)
The large high-quality optics of the TX200 offer a good "theoretical" starting point for high optical sharpness. But how does it look in practice?
Our test machine showed continuously good sharpness over the entire image, even in the boundary regions. Here, the optics pay off.
When making strong use of the Lens Shift feature however, visible deficits showed: the image could not be focused equally over the entire image with our test machine. This clearly limits the range of the Lens Shift feature.
Illumination over the projected image is even, there is no visible decay towards the edges. The Adaptive iris does not have a negative influence on the illumination in the dark ranges.
Convergence is subject to a certain nominal dispersion: on our test machine it was excellent up to the edges of the image. At most, half a pixel of chromatic distortion was visible, which is not noticeable in normal operation.
3.7 Overscan (Know How Link here)
Regarding Overscan, most manufacturers have learned a thing or two: in the age of DVD and HDTV hardly any projector has a large overscan or one that can not be disabled. In particularly practical cases a user can determine himself whether and how strong the edges are cut off. The TX200 belongs to the latter group, in eleven steps the edge of the image can be adjusted from 0 to 40 pixels.
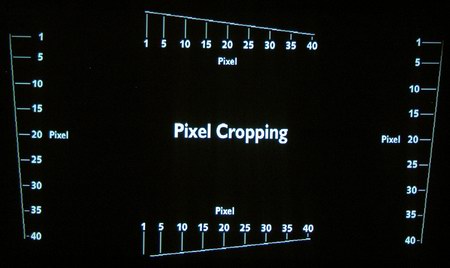
Above: overscan disabled
Below: maximum overscan
The only confusing thing is the numbering: with "0" overscan is maximal, at "10" it is disabled. Once you get accustomed to the switch however, there are no problems whatsoever in control of the overscan.
3.8 De-Interlacing (Know How Link here)
As before, there are still differences between projectors with regard to de-interlacing. Some manufacturers take the input and processing of interlaced-images seriously, others neglect the issue, particularly regarding the European PAL video system.
Video material
With video, like TV shows, sports broadcasts or your own video recordings, the TV-mode comes into play, using the Motion Adaptive procedure, which merges static picture elements of two successive half-images while moving picture elements are extrapolated by the internal scaling electronics. This procedure has been implemented quite well in the Hitachi. Video images (from for instance a satellite receiver) are converted to a progressive signal with very good sharpness, but at times artifacts rear their ugly heads. Nevertheless, the TX200 is very well suited for occasional TV viewing.
Movie material
A PAL suited movie mode has been neglected. The de-interlacer can be forced to handle movie images In the Picture menu, but in practice this does not offer any improvement. The projector is not able to recognize two successive half-images of the same movie image and therefore can not reconstruct the original accurately. This results in edge flares in small details and structures in the image which are disturbing especially when viewing on a big screen. During movie presentation, attention should absolutely be paid to having a good progressive signal as input!
In the de-interlacing department, no improvements seem to have been made compared to its predecessor. This is a pity, since our PAL standard is not a thing of the past, yet...
3.9 Details / Scaling / Sharpness (Know How Link here)
Even a HD-ready projector like the PJ-TX200 can only use its native resolution to the fullest when its signal processing and, in the case of PAL, its scaling electronics are of very high quality.
3.9.1 Signal processing
Analog / Digital
The signal processing should process the incoming signal in very high detail, without generating disturbing image artifacts like oversharpening or double outlines.
As was the case with its predecessor, the TX200 shows excellent results here (see image above). Without double outlines the incoming signal is processed precisely and sharply, the image remains detailed and yet natural.
3.9.2 Horizontal scaling
The DVD resolution of 720 x 576 pixels is clearly below the native resolution of the projector (1280 x 720). To be able to view a full screen image, the input signal must be converted by the internal scaling electronics.
Analog / Digital
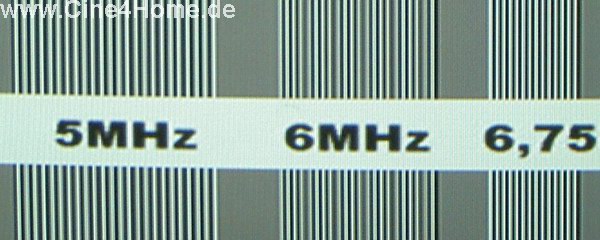
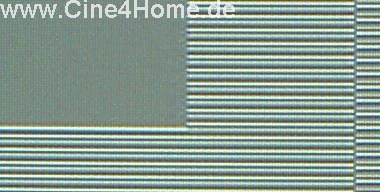
Horizontally, the projector scales the incoming signal up to the highest resolution reliably, but not without fault. Especially in the 6MHz range, fluctuations in linearity can be detected.
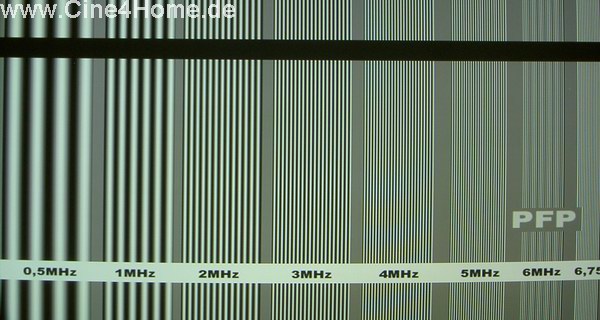
Multi burst, monochrome and colored
When viewing a movie, these inaccuracies can cause small interferences in fine structures, which are particularly noticeable on horizontal camera movement. Altogether we should not overestimate this small deficit, but other current models like the Sanyo Z4 for instance do a better job on horizontal scaling. Even its little brother, the TX100, has some advantage over the TX200 here.
Higher resolutions up close

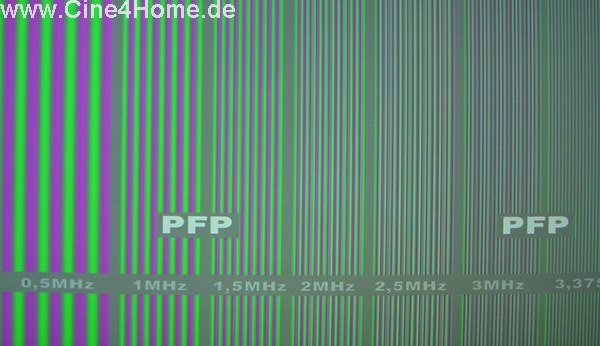
Besides this, we have noticed a substantially larger conversion error with color resolution, a horizontal "Chroma Bug". What does this look like?
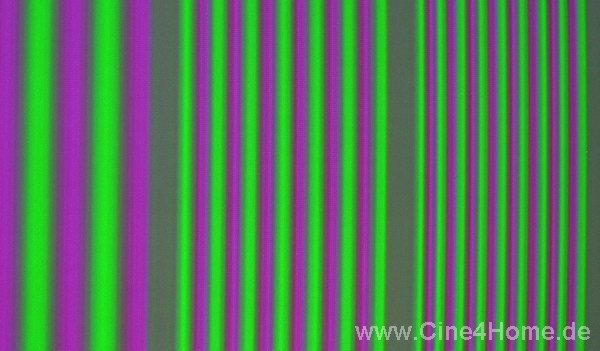
As can be seen in the image above, the colored bars do not seem to be equally "round" but a bit cross, and darker or lighter in some areas. Apparently vertical stripes are interchanged here. The phenomenon can be seen even better with the well known test image Siemens star:
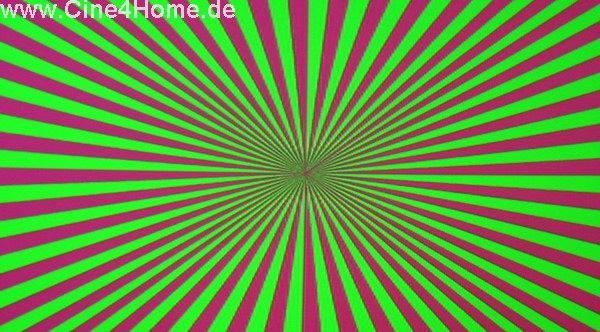
Visible fraying on a HDMI 576p input.
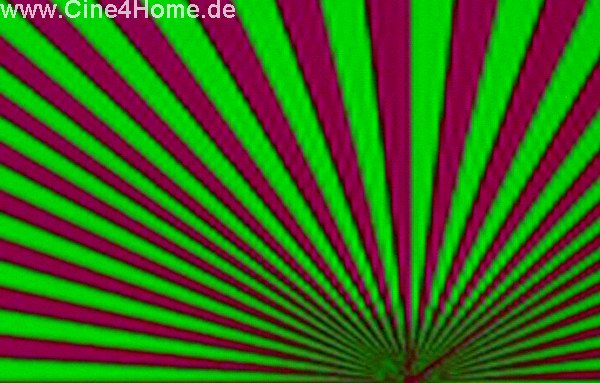
The colored beams do not show straight edges, but are clearly frayed. The more detailed the range, the more apparent the fraying. In normal movie viewing operation small strong colored details are affected by this, as they often occur in animated movies. The error is particularly noticeable with an 576p input signal. But also when using a 720p signal it can clearly be seen.
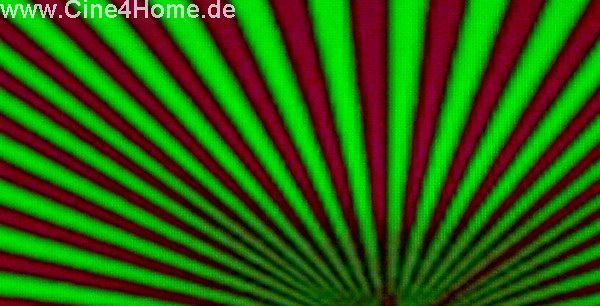
Diminished fraying on 720p
Only when using 1080i or analog input, no annoying fraying can be recognized.
Since the error as seen above only shows on digital HDMI input signals and we have seen the problem before in beta-tests of other devices, we point our finger to the scaling filter of the HDMI receiver. This means that the problem should be correctable by a software update of the HDMI receiver. We have already informed the manufacturer of the bug last year, but have not received a firmware-update yet. We would like to recommend an imminent update to remove the error, in order to avoid discussions like those about the "DVD Chroma Bug" at the time of the introduction of the first progressive scan DVD players.
3.9.3 Vertical scaling
Analog / Digital
The conversion from 576 lines (PAL) to 720 lines (projector) is excellent again. Without many interferences the internal scaling converts the lines of different DVD resolutions.

Even single line details, which unfortunately are a rarity even with today's DVD's, are converted in such a way that in normal movie viewing no deficits can be seen.
On the whole, the scaling and detail characteristics of the TX200 can just be noted as good. The unnecessary inaccuracies with HDMI are unfortunate, something that was missing from its predecessor by the way. Even in the price range of the TX200 we expect a better quality control before distribution.
Note:
- with image material in the 4:3 television format a part of the horizontal resolution remains unused. As is the case with a conventional 16:9 television, black bars appear on either side of the image. The remaining resolution of 960 x 720 is still clearly above our PAL standard however, so even with 4:3 material there is no lack in image detail.
3.10 Shading / Color uniformity (Know How Link here)
The TX100 already was not risk-prone with regard to color clouds because of its well thought out service menu. On the TX200, this was improved yet again: shading is more conscientiously corrected out of the box with the new model, all of the test models we looked at displayed a uniform color temperature over the entire image. Deviations towards the edges and corners were small enough not to be noticed when viewing a movie.
If one requires more perfection or should the shading change over time, the competent dealer can help with the service menu: in a further improved system the shading can be optimized for different brightness levels. This way, any bad surprises later on can be countered.
3.11 Vertical Banding
For vertical banding, the same applies as to shading: a conscientious out of the box tuning and the possibility of correction in the service menu leave the much to discussed vertical stripes, which are particularly noticeable in uni-colored surfaces with horizontal camera movement (as with for instance football), as a problem of the past. The projector doesn't have to hide itself from the competition here.
3.12 Image Evaluation
Picture evaluation overall:: 1,83 (Good +) |
|
Black level & contrast |
1,2 (Very good -) |
Sharpness & interpolation |
2,3 (Good -) (because of Chromabug) |
Color range / temperature |
1,3 / 2,1 |
De-Interlacing |
2,5 (Good -) |
Other aspects |
1,6 (Good +) |
(All evaluations refer to their respective kind of projection and the current state of technology. A direct comparison between machines is therefore only conditionally possible!)
4. Conclusion
The PJ-TX200 had the perfect conditions to become a convincing projector as its predecessor, the PJ-TX100, was also one of the best of its generation. Our elaborate tests confirmed this in nearly every way, the engineers took the predecessor as base and improved on those details todays home theater enthusiast would find important.
The revised chassis maintains the flexible positioning characteristics, especially the large optics offers visible advantages here, even if using Lens Shift to its fullest leads to loss of sharpness. The ventilation is quiet and suitable for living room use, as before. The design was given a slight facelift, and now seems even more modern and optically more pleasing. The biggest weakness of its predecessor, susceptibility to dust, has been eliminated according the the manufacturers information with the implementation of a new electrostatic filter. Whether or not this will actually be an improvement remains to be seen in practice over time.
The control of the projector has not changed from that of its predecessor, apart from the new functions. This also makes sense, because the combination of a practical remote control and the clear while at the same time versatile On-Screen Menu is exemplary in every way, and can rarely be found on a projector in this way.
With regard to the display technology, two changes are most noteworthy: the new D5-panels and the adaptive iris in front of the lamp. Both should lead to improvements in image contrast. Our test revealed this to be true: the PJ-TX200 offers excellent black level in "Auto1" mode, while at the same time maintaining a high brightness in bright scenes. The in-image contrast offers an impressive depth of the image. On the whole, a known deficit of LCD technology has been visibly improved, even if it has not reached the level of DLP yet. The occasional flickering, caused by the adaptive iris with rapid brightness changes, is annoying and leaves further room for improvement for the next generations.
Good factory settings and above all outstandingly versatile calibration options allow the projector excellent results regarding color and brightness distribution. Once properly adjusted, the TX200 will display the image on the screen just as the makers intended, if a good input signal and/or DVD is used of course. Compared to its predecessor, the Picture options were extended, which is surprising considering the versatility of the TX100. Now you can get a grip on the projector even faster, and more precise.
Once adjusted, the image shows almost no weaknesses: dark ranges are well displayed, as are the bright. The colors are strong but yet not overly saturated or unnatural.
Image sharpness is precise without over-sharpening or double outlines. The annoying "Chroma-Bug" is very unpleasant however, leading to fraying of colored details in the image. A software update to correct this issue would be highly recommended.
The projector also shows signs of weaknesses in the de-interlacing, both with video and movie material. Especially on the latter the projector does not offer what is currently available in its price range (i.e. Panasonic PT-AE900).
Outstanding however are the results when fed HDTV (even 1080i). The image is displayed in excellent detail in relation to the high contrast and the perfect colors the TX200 can meet its match even in higher price ranges.
Altogether, the projector is at least on the same level as its current competitors. This doesn't make the agony of choice any easier, as every model has its own specific pro's and con's. Therefore we advise every prospect customer to take their time in comparing all projectors, and choose the one which is most close to your personal preferences. The TX200 should not be overlooked, it has convinced us in the entry level segment, as its predecessor did last year!
5. Evaluation
+ High contrast
+ Good build quality
+ Clear operation
+ Many adjustment options
+ Few LCD-artifacts
+ Powerful Service-Menu (for specialized dealers)
- Color fraying (Chroma-Bug)
- PAL-Film mode with weaknesses
- Partially perceptible functioning of the adaptive iris.
- Visible pixel structure
- Inaccuracies in white alignment
- Loss of sharpness with maximal Lens Shift use
Evaluation : 1,5 (Very good -) |
|
Build & Features |
1,4 (Good +) |
Operation |
1,8 (Good +) |
Technology |
1,4 (Very good -) |
Picture |
1,83 (Good +) |
Price / Performance |
1,0 (Very good) |
(All evaluations refer to their respective kind of projection and the current state of technology. A direct comparison between machines is therefore only conditionally possible!)
21. Januar 2005, Ekkehart Schmitt
Translation: Den Walterfang
6. Technical Details (according to the manufacturer):
- Resolution: 1280 x 720 Pixel
- Technology: 3 x 0,7" LCD Panels
- Colors: 1,07Mio./ 10 Bit
- Brightness: 1200 ANSI Lumen
- Lamp: 150W
- Lamp life (est.): 4000h
- Contrast ratio: 7000:1
- Focus: F: 1,7 ~ 2,4
- Projection distance: von 0,8 m bis 13,8 m
- Size of the projected image: von 0,76 m bis 7,62 m
- Operating noise: 28/25 dB
- Screen ratio: 16:9
- Screen diagonal: bis 300" (7,60m)
- 16:9 and 4:3 image format
- Ceiling projection
- Lens Shift
- Vertical correction
- Receiver system: NTSC, NTSC 4.43, SECAM, PAL
- Supported signals: 480i / 480p / 576i / 576p / 720p / 1080i / SVGA / XGA / SXGA / MAC uva.
- Connections: RGB-analog (15-pin D-sub), S-Video (4-pin Mini-Din), FBAS, Komponenten Cinch, HDMI
- Dimensions (HxBxD): 113 x 340 x 298 mm
- Weight: 4,7 kg
- Color: Silver